
AirPods are one of Apple’s most popular wearable devices, and they’re incredibly feature-rich and convenient for Apple users. That’s especially true with these AirPods tips and tricks that can help you master your earbuds.
Although AirPods are generally easy to use compared to other Bluetooth headphones, they are actually full of various features that might get lost in the mix when you’re first learning to use them.
To help you make the most of your wireless headphones, we’ve put together a list of the most valuable AirPods tips and tricks.
Contents
Related reading
- How to set up and use background noise with your AirPods
- Apple AirPods 3rd Generation vs AirPods Pro, which one should you buy?
- Spatial Audio not working on Apple AirPods or Beats? Steps to fix it
How to connect your AirPods to your iPhone
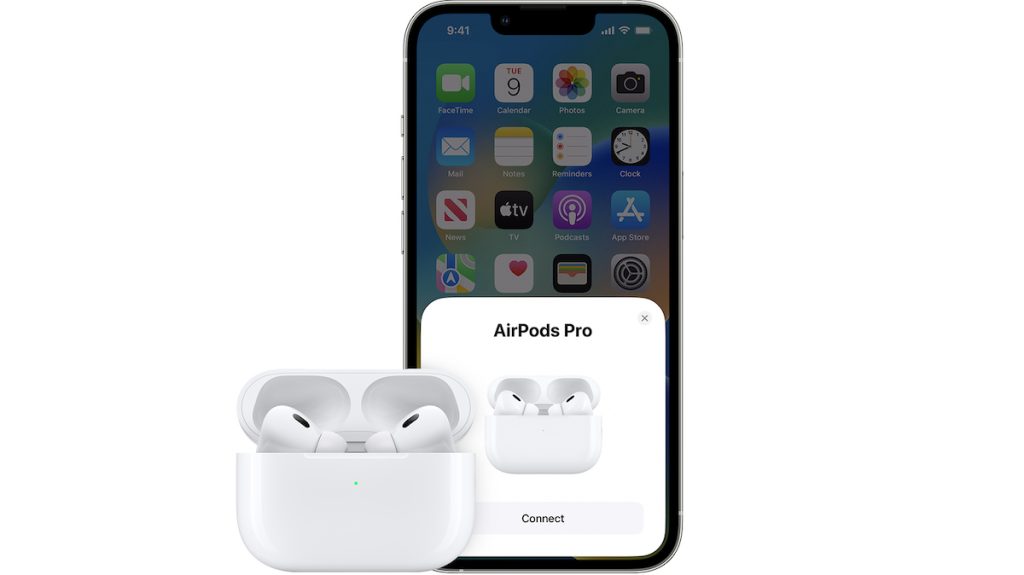
The first step in mastering your AirPods, AirPods Pro, and AirPods Max is to connect the headphones to your device. Luckily, this is an easy step.
For AirPods, make sure that the charging case and device are charged. Then, open the Charging Case or (Smart Case for AirPods Max) near your iPhone. This screen should automatically pop up.
Just tap Connect, and your AirPods officially connect to your device.
When the AirPods are connected, all you need to do to use them is open the charging case and place the AirPods themselves in your ears. They automatically detect when this happens, and the audio switches from your device’s speakers to your headphones.
Better yet, your AirPods also automatically sync across all devices on your iCloud.com account. For example, if no audio is playing on your iPhone, you can open the AirPods charging case near your Mac to connect them to your computer automatically.
How your AirPods Charging Case works
You only need to place your AirPods within their respective Charging Case or Smart Case to charge your AirPods. When the case is fully charged, it can charge your device several times.
The Charging Case or Smart Case can then be charged via Lightning, or wirelessly on a Qi-compatible charging pad. Connecting the case with AirPods in it also charges your headphones.
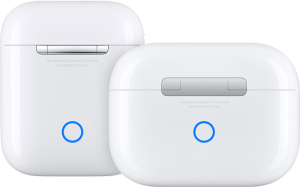
Beyond that, the Charging Case and Smart Case are relatively simple devices. Basically, the only thing on it is a status light. The status light shows your charge or connection status when your case opens.
Here’s what the lights mean.
- Green: Your AirPods case is fully charged.
- Amber: There’s less than one charge remaining in your case.
- Flashing white: Your AirPods are not paired to a device but can be.
- Flashing amber: There’s an issue, and you may need to set up your AirPods again or re-pair them to your device.
On the second-generation AirPods Pro, the case plays a sound when it begins charging. You can stop it from doing so by going to Settings > Your AirPods and disabling Enable Charging Case Sounds.
The button on the back of your AirPods Charging Case generally has two main purposes: connecting AirPods to non-Apple devices and mitigating bugs.
If you press the back button with the earbuds in the case, your AirPods enters a standard Bluetooth pairing mode. This allows you to connect your AirPods to non-Apple devices, such as a Windows PC or an Android smartphone.
Press and hold the button until it flashes white. Then, head to the Bluetooth settings on your non-Apple device, and you should see the option to pair.
The back button also serves as a quick reset for when you’re experiencing problems. If you have audio or connectivity issues, press and hold the back button for at least 10 seconds.
This resets your AirPods case and allow you to re-pair the earbuds with your Apple device. (And it may save you a trip to Apple Support.)
Basic AirPods, AirPods Pro, and AirPods Max controls
Now that you’ve connected your AirPods to your device and know what the charging lights mean, you can learn basic controls and other AirPods tips.
AirPods Stem Controls
Mostly, you control your AirPods, AirPods Pro, or AirPods Max using its stem. You can do much with your audio wearables without touching your iPhone.
- One squeeze: Play or pause your audio
- Two squeezes: Skip to the next track
- Three squeezes: Go back to the last track (or start the song over)
- Long squeeze: Switch between Active Noise Cancellation and Transparency Mode. Alternatively, this triggers Siri on third-generation AirPods.
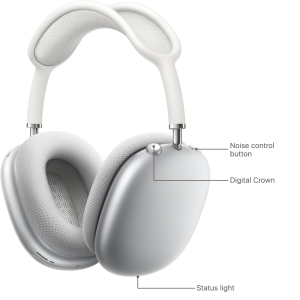
The process is different on the AirPods Max because it has physical buttons and a Digital Crown. You’ll adjust the volume of your AirPods using the crown, but pressing it also unlocks additional functionality.
- One press: Play or pause your audio
- Two presses: Skip to the next track
- Three presses: Go back to the last track (or start the song over)
- Long-press: Activate Siri
First- and second-generation AirPods also work differently than newer models. Instead of squeezing the stem, you’ll double-tap on your left or right AirPod to trigger an action. These actions are customizable, which we’ll get to below.
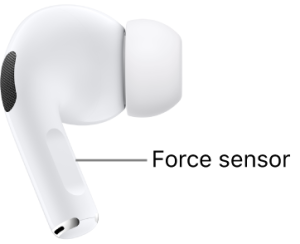
Users of the second-generation AirPods Pro can quickly adjust their volume by swiping up or down on the stem.
Changing the volume on other AirPods requires using your connected iPhone — specifically, swiping down from the Control Center and adjusting the volume there.
If you get a phone call while wearing AirPods and you want to answer it, you’ll need to double-tap on the stem of your first- or second-generation AirPods. For third-generation AirPods or AirPods Pro, squeeze the stem once.
“Hey, Siri”

You can control a lot of AirPods functions using the stems, but you can control even more using the built-in Siri voice assistant. The exact method for doing so differs based on your model, however.
You can invoke Siri by double-tapping either AirPod and waiting for a chime sound to play for first- and second-generation AirPods.

Users with third-generation AirPods, either generation of AirPods Pro or AirPods Max, can activate Siri using the “Hey, Siri” voice command. You can set that up by doing the following:
- Open Settings on your iPhone.
- Navigate to Siri & Search.
- Make sure that Listen for “Hey Siri” is enabled.
- If you’re setting up Hey Siri for the first time, you must train the assistant to recognize your unique voice.
- If prompted to set up Hey Siri, follow the onscreen commands. It involves saying “Hey Siri” a few times.
Once you activate “Hey Siri” on your iPhone, that setting carry over to your AirPods. You should be able to invoke the digital assistant using the command phrase when your AirPods are in your ears.
From there, you can use Siri to:
- Raise or lower your volume.
- Make a call or send a text to a contact.
- Play a specific song name. (The default is Apple Music, but you can specify.)
- Set a reminder.
- Schedule a meeting.
- Get a translation for a word in another language.
- Take a note.
Additionally, you can also use Siri to announce incoming calls. That setting is editable in Settings > Siri & Search > Announce Calls. Ensure that both “Headphones Only” or “Headphones & Car” are enabled. 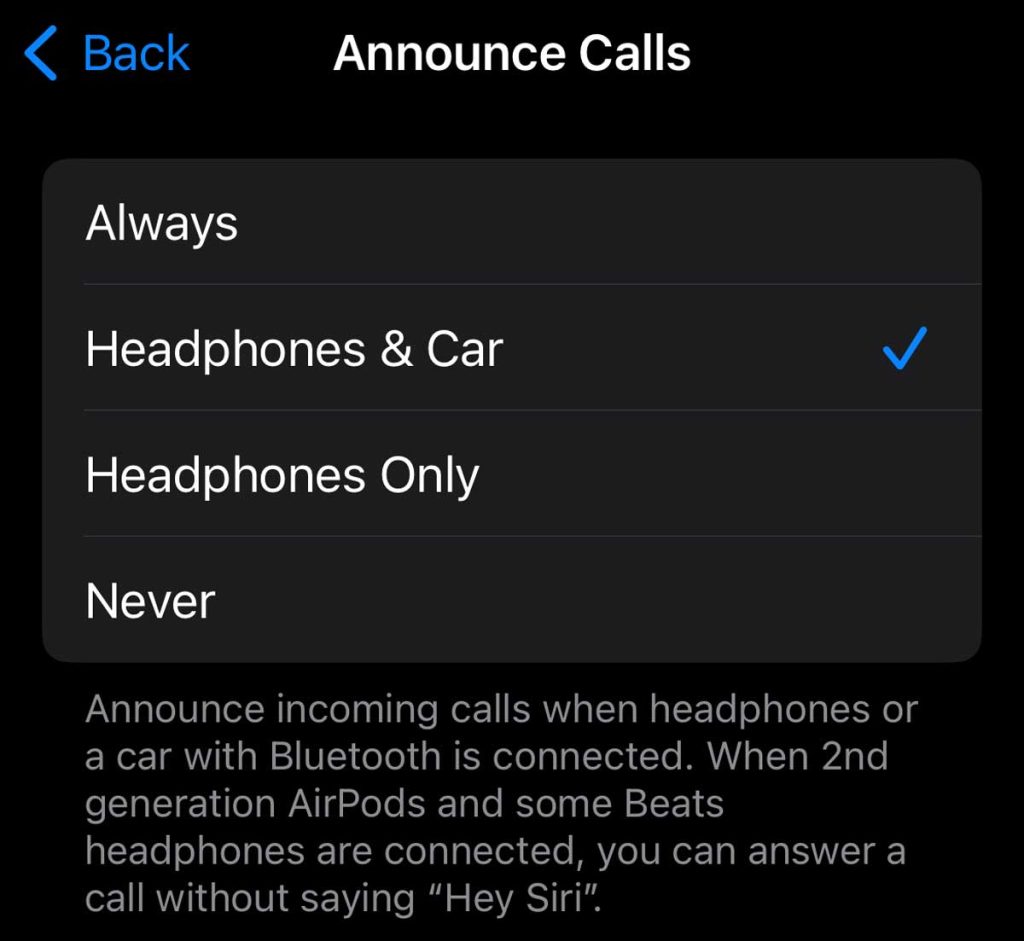
Siri can also announce various notifications from your iPhone. Head to Settings >Siri & Search > Announce Notifications to edit this setting. Here, you select which apps you want Siri to announce notifications from.
For something like a text, Siri can even read out the message’s contents on AirPods. Just select the Messages app and ensure you toggle on Announce Notifications. Then, choose if you want time sensitive and direct messages only or all notifications. 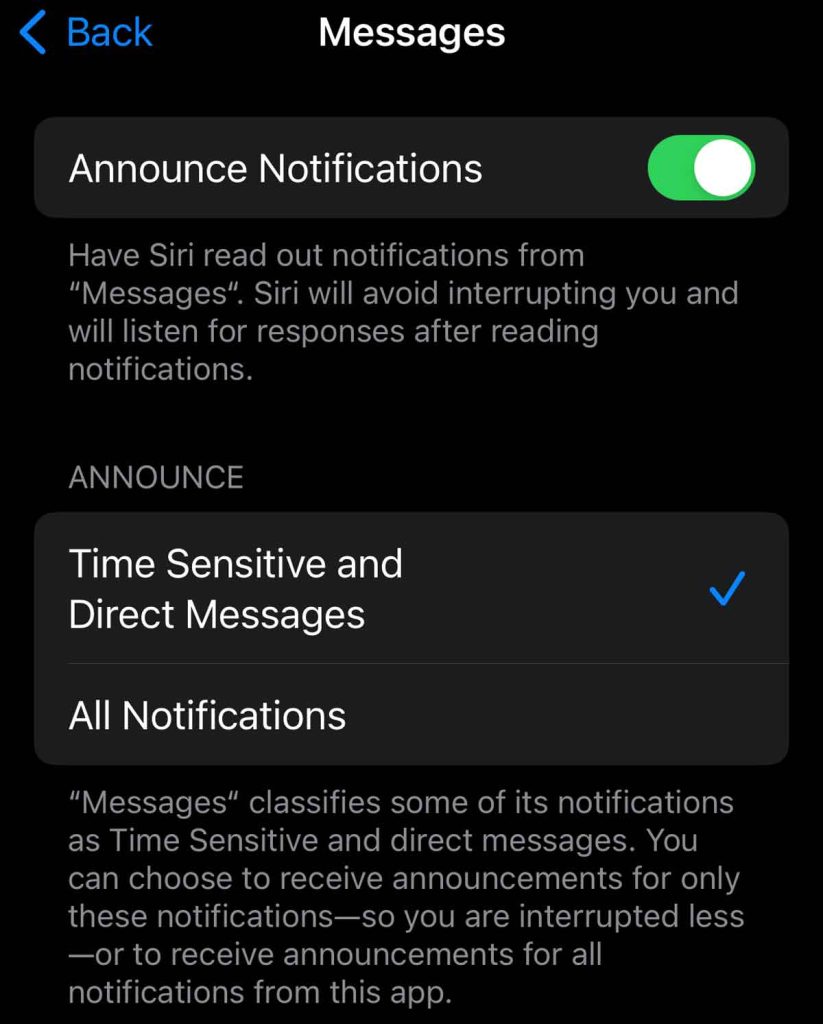
Edit those AirPod settings
Unlike an Apple Watch, AirPods have no dedicated settings app. However, that doesn’t mean you can’t adjust specific aspects of your wireless earbuds.
There’s a dedicated settings page for the AirPods. On iOS 16 and above, this pane automatically pops up near the top of the Settings app when your AirPods are in your ear.
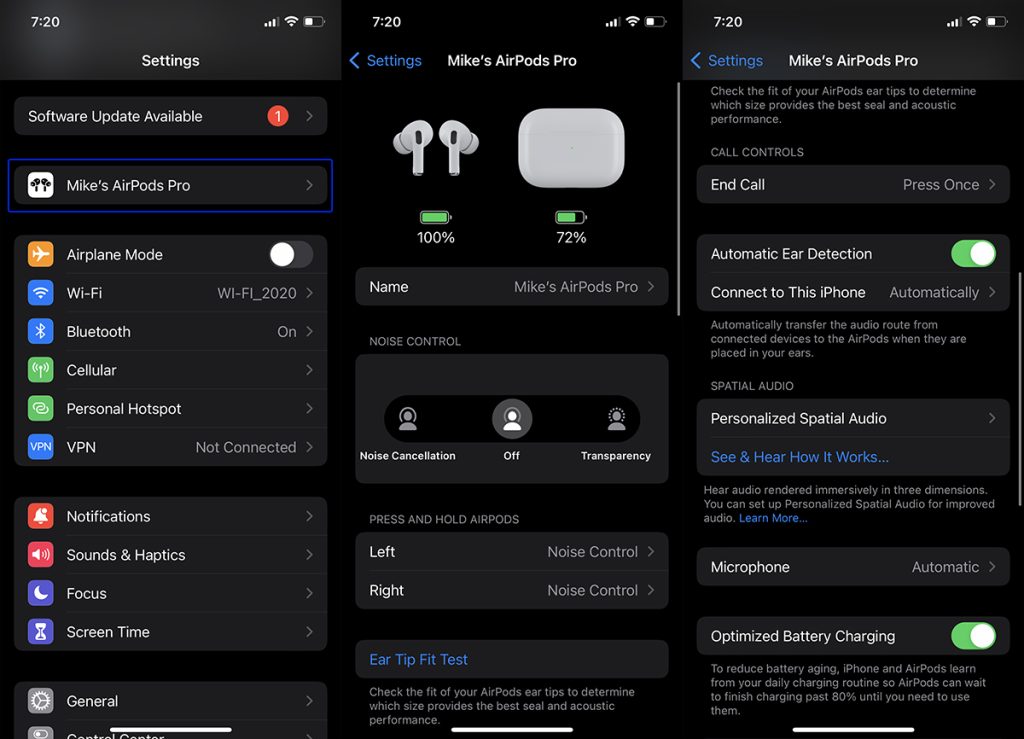
In this pane, you’ll see the charge level of both AirPods and your charging case. You’ll also be able to:
- Change the name of your AirPods.
- Turn Active Noise Cancellation on or off.
- Turn Automatic Ear Detection on or off.
- Map a specific function to double taps and press-and-holds for various AirPods models.
And a lot more. It’s worth diving into this settings page and adjusting specific settings depending on your AirPods model so you can customize your earbuds.
If you’re not running iOS 16 or later, getting to the settings menu is slightly different. You’ll need to open the Bluetooth menu in the Settings app, find your AirPods, and tap the “i” icon next to them.
Other useful AirPods tips and tricks
Now that you have the basic controls down, you’re pretty much good to go when using AirPods, AirPods Pro, or AirPods Pro Max. However, there are some lesser-known AirPods tips that can help you get the most out of your earbuds.
How to find a pair of lost AirPods
 Let’s face it — small objects like AirPods can get lost really easily. Luckily, there’s an app for that.
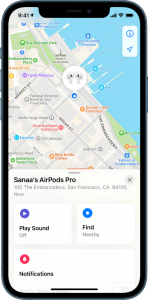
You might not assume that AirPods can be located remotely, but the Find My app on your iPhone, Mac, or iPad, actually tracks your earbuds’ location.
Just open the Find My app. From here, you’ll be able to see the AirPods’ last known location. By tapping on Play Sound, you can make your AirPods play a sound to make them easier to find. (This can be loud, so make sure you’re not wearing one or both AirPods when you tap this.)
If you’re unsure where you last saw your AirPods, you can see the last known location on the map. This is the spot where your AirPods last connected to your iPhone via Bluetooth.
How to connect two AirPods to a single device
 You can connect two pairs of AirPods to a single iPhone and share audio between both earbuds. This is a useful feature for sharing music, videos, or other content while you’re in a public space.
To do so, follow these steps.
- Make sure your main pair of AirPods are connected to your iPhone.
- Put your AirPods in and begin playing a piece of audio content.
- Swipe down from the upper right to access the Control Center.
- Tap on the AirPlay icon.
- In the AirPlay menu, tap on Share Audio.
From here, bring another pair of headphones close to your iPhone. For Beats, you’ll need to place them in pairing mode.
When the headphones appear on your screen, tap Share Audio.
Conduct an Ear Tip Test for optimal comfort
 Every pair of AirPods Pro comes with several silicone ear tips that allow you to customize the fit based on your ear. This has several benefits, including better audio quality, comfort, and noise cancellation.
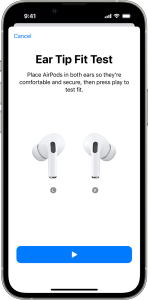
If you’re not quite sure which silicone tips fit your ear best, Apple has a feature that allows you to carry out an Ear Fit Test. Here’s how.
- Place your AirPods Pro in your ears.
- Go to Settings.
- On iOS 16+, tap on your AirPods. On older versions of iOS, go to Bluetooth and tap on the “i” icon next to your AirPods.
- Scroll down and tap on Ear Fit Test.
- Tap Continue and follow the prompts.
The system then analyzes whether your silicone tips are the right fit. It suggests adjusting the fit in your ear, switching to another pair of tips, or sticking with the ones you already have.
Personalize the Spatial Audio feature
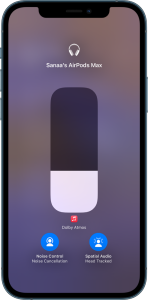 Spatial Audio is an iOS feature that makes sound played on a device like it’s coming from all around you. In other words, it’s a much more immersive way to experience songs, movies, and more.
To use Spatial Audio, you’ll need AirPods Pro, AirPods Pro, third-generation AirPods, Beats Fit Pro, or Beats Studio Pro.
On iOS 16 and later, you can also personalize your Spatial Audio feature to make it even more immersive and customizable. To do so, you’ll need an iPhone with a TrueDepth camera.
- Place your AirPods in your ears.
- Go to Settings.
- Tap on your AirPods.
- Tap on Personalized Spatial Audio.
- Finally, tap on Personalize Spatial Audio.
The system walks you through steps to personalize your audio experience. Follow the prompts.
You can turn Personalized Spatial Audio on or off by tapping on Stop Using Personalized Spatial Audio.
Learn more about spatial audio in this article: Spatial Audio not working on Apple AirPods or Beats? Steps to fix it
Customize how much noise is coming through in Transparency mode
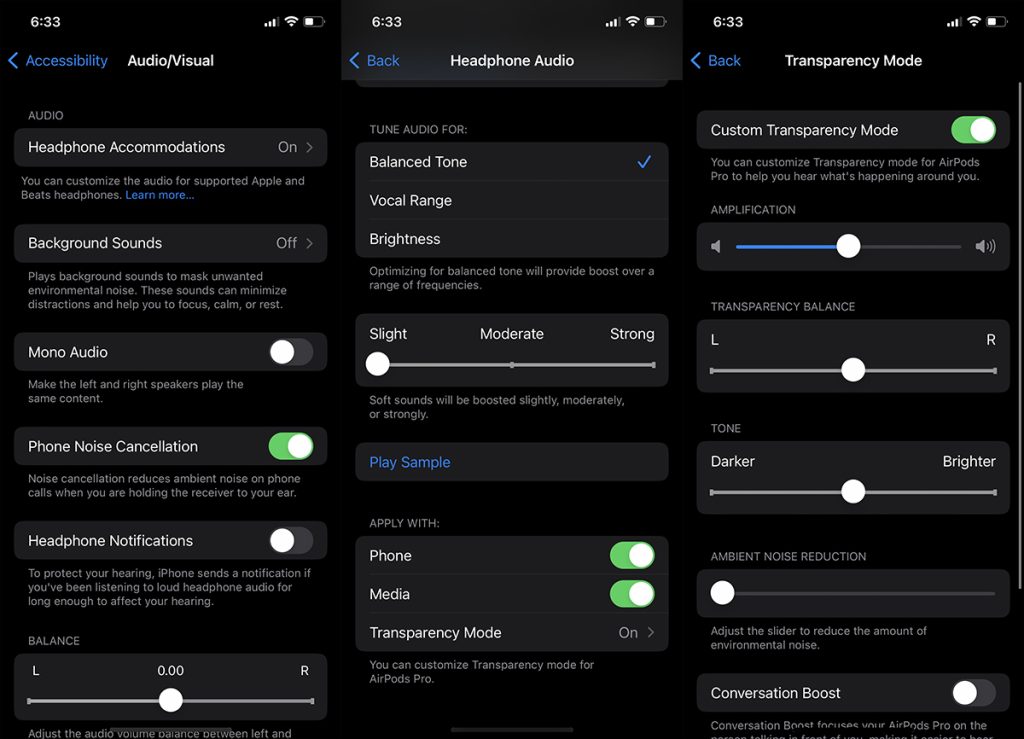
If you have a pair of AirPods Pro or AirPods Max, you’re likely familiar with Active Noise Cancellation. The opposite of this feature is Transparency Mode, which allows ambient noise to come through with your playing audio.
You might not know that this feature is actually customizable. This is probably one of the least known AirPods tips.
To customize Transparency Mode, you can head to Settings > Accessibility > Audio/Visual and hit the toggle next to Headphone Accommodations.
From there, tap on Transparency Mode and turn on Custom Transparency Mode. From here, you’ll be able to adjust how much ambient noise is blocked.
This menu also has a nifty feature that lets you more easily hear people talk called Conversation Boost. This makes it easy to have a face-to-face conversation with someone since it allows the audio to focus on the person in front of you.
Update your AirPods firmware 
Finally, we get a lot of questions about how to upgrade the AirPods’ software and firmware. When Apple pushes out a new update, it automatically installs the next time you charge your AirPods, and they are in Bluetooth range of your iPhone, iPad, or Mac (as long as they are connected to Wi-Fi.)
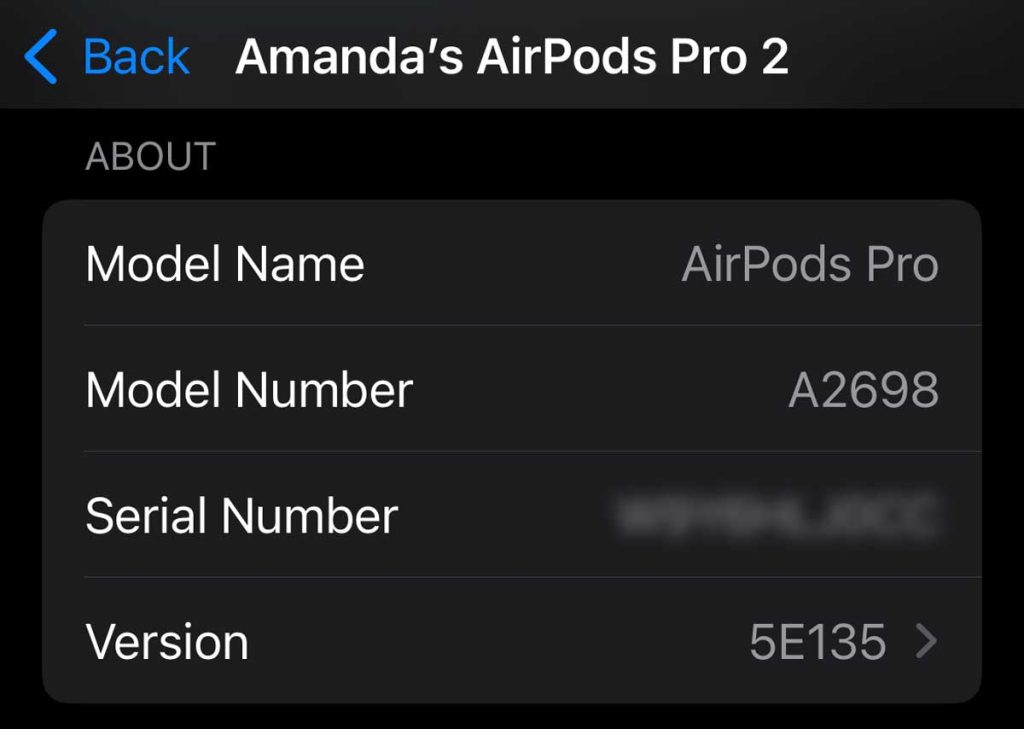
But you can always check your installed firmware by opening the Settings > Airpods menu or going to your iPhone’s or iPad’s Settings > Bluetooth, then tap the “i” Info button next to the name of your AirPods. Scroll down to the About section to find the Version (that’s your firmware), serial and model numbers, and more. It’s a handy place to check all your AirPod info!
For Macs, press and hold the Option key while choosing Apple menu > System Information. Choose Bluetooth, then look under your AirPods for the firmware version.
With macOS Ventura and above, you can also choose Apple menu > System Settings, click Bluetooth, then click the Info button next to the name of your AirPods.
Unlike iOS, iPadOS, or even MacOS, Apple doesn’t update its AirPods’ firmware frequently.


