
So, you’ve just become a Strava Summit subscriber and you want to get the best out of Strava Routes (previously called Strava Route Builder). Or maybe you’re thinking about making the jump and you want to check out if Routes is right for you.
With Strava Routes you say where you want to go and how you want to do it. Strava calculates the rest.
Strava Routes recommends personalized routes based on your preferences for location, distance, and surface type. If you visit a new place or want to discover a different path, Strava Routes is for you.
We think it’s awesome! So here’s our definitive list telling you everything you need to know about Strava Routes so you can maximize your subscription.
Contents
- 1 How to start with Strava Routes and get a recommended route you like
- 1.1 How do I customize my Recommended Route?
- 1.2 How can I see each route’s Elevation and Surface?
- 1.3 How do I change my map type?
- 1.4 What’s the Strava Global Heatmap and how do I use it?
- 1.5 How do I build my own route?
- 1.6 How do I save my route?
- 1.7 Where do I find my saved routes?
- 1.8 How do I edit a saved or suggested route?
- 1.9 How do I edit my route in an app like Komoot?
- 1.10 How do I use my route?
- 1.11 How do I download my route?
- 1.12 What about downloading or syncing Strava Routes to Garmin devices?
- 1.13 How do I print my route?
- 1.14 How do I share my route with my friends?
- 1.15 How do I use someone else’s route?
- 2 Summary
Related Reading
- How to check your Strava Weekly totals after the latest update
- Komoot: best tips and tricks for every bike enthusiast!
- Apple Watch not capturing or tracking workout routes in Maps? Let’s fix it
- Peloton metrics missing on Apple Watch Peloton app? Try these tips
- Strava Segments not working? Let’s fix that!
- These Intermittent Fasting apps will keep you healthy in 2020
- 11 tips and tricks for your new Polar Unite SmartWatch
How to start with Strava Routes and get a recommended route you like
Before you start, make sure you’ve got the latest version of the Strava app. For iOS that’s currently version 140.0. For Android, it’s 140.10. And allow the Strava app to access your location from your phone’s settings via Privacy > Location Services for iPhone and Settings > Apps for Android.
And of course, you also need to be a paid Strava subscription member to access these running or riding routes. Strava’s route builder is no longer available for free accounts.
- Open Strava on your phone
- Click the Explore button – bottom left on the app
- Then click Explore Routes

If it’s your first-time Strava suggests three routes based on your current location and chosen sport.
For cyclists, it’ll pick rides just under 15 miles and for a runner, Strava picks routes around five miles long.
How do I customize my Recommended Route?
There are five ways you can customize the routes Strava recommends on the Explore Routes page. On mobile, they’ll appear at the top of your screen.
- Location (start/end): Choose your start and finishing location or just go with your current spot using the GPS function on your phone
- Ride/Run: Specify your sport type. Running or Cycling
- Distance: Choose between Kilometres and Miles. There’s a range between one and 30 miles for runners and one and 100 for cyclists
- Elevation: Flat, hilly, or any. This really depends on your location though
- Surface: If you’re on the app you may have to swipe right to see this one. You can prioritize paved roads or dirt tracks or just stick with popular routes. Again, this one depends a lot on your route length and surrounding location
Strava recommends these routes based on public Strava activities and open-source data from OpenStreetMap.
RELATED: iGPSPORT 20E – is this budget-friendly GPS bike computer worth it?
How can I see each route’s Elevation and Surface?
Simply click on See Details underneath your desired route and Strava loads up a handy cross-section of your journey’s elevation, as well as a clear breakdown of the surface types.
There’s also a nice list of popular segments, perfect if you’re the type that loves hunting down those precious achievements! 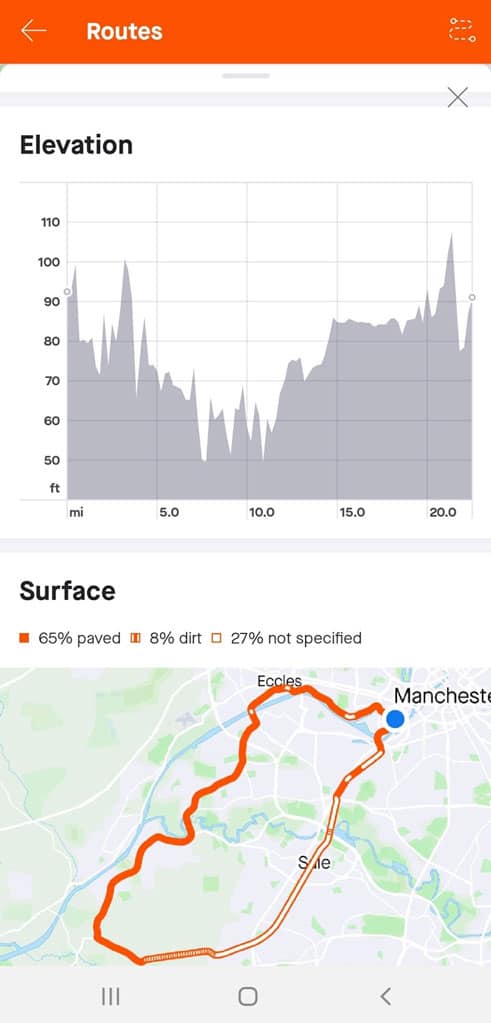
How do I change my map type?
Again, another easy one.
- Tap the icon in the top right that looks like two flat squares stacked on top of each other
- Then, choose between standard map, satellite, or a hybrid of the two
What’s the Strava Global Heatmap and how do I use it?
Every road, track, or path ridden or ran on by a Strava user is added onto the site’s Global Heatmap. It’s a clever aggregation of public activity from the last two years. 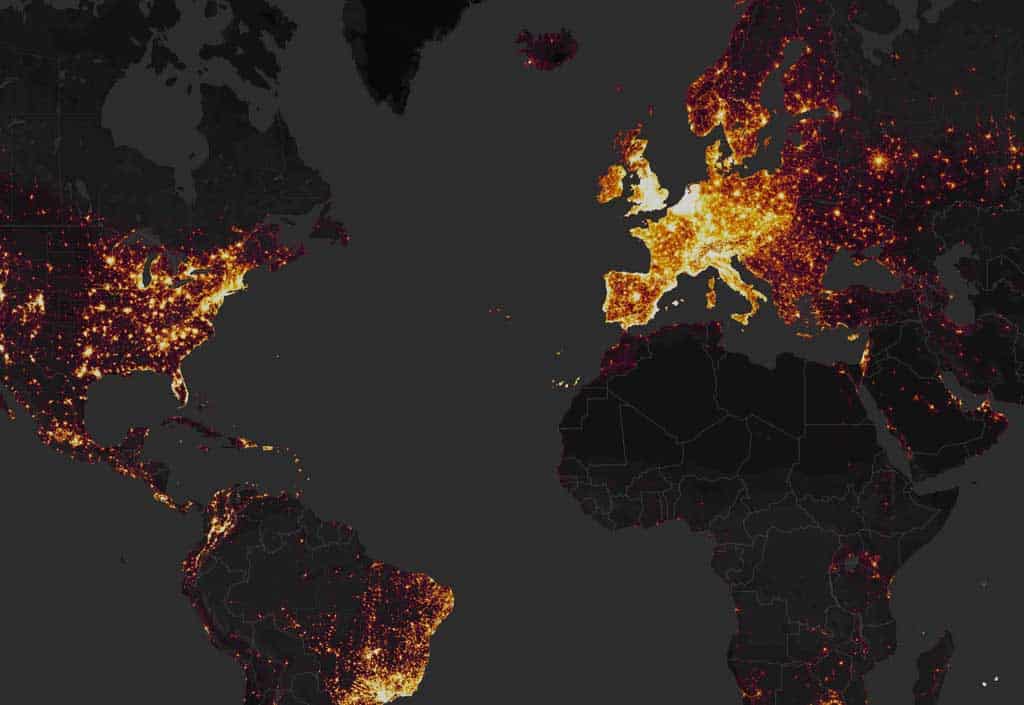
Strava subscribers can view and create personal heatmaps to visualize their own routes
Essentially, the darker the color the more popular the path.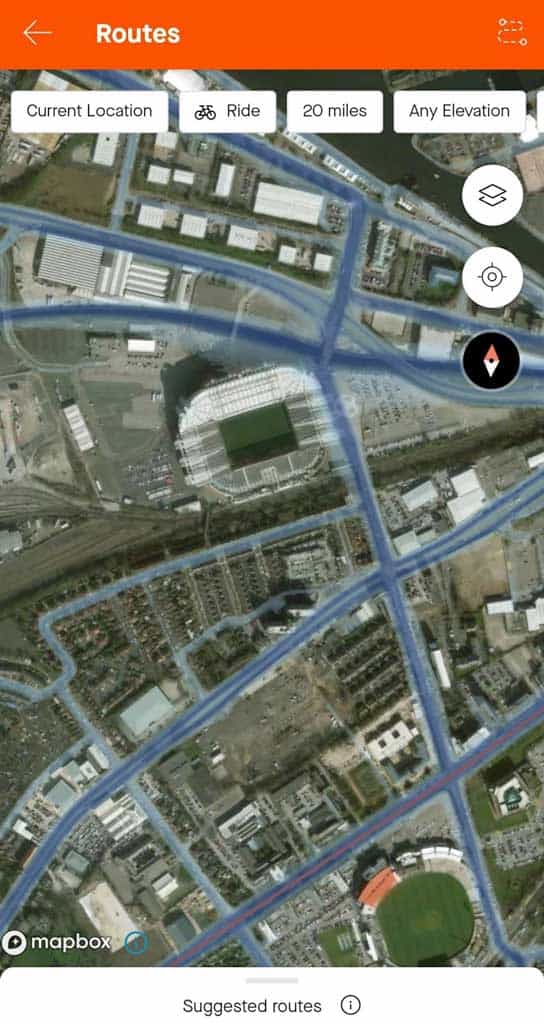
By selecting the Global Heatmap option you’ll be able to see how preferred your route is.
Unless you’re keen on exploring the rarely explored, we’d suggest sticking to the most popular tracks. They’re the ones the locals use, there must be a reason why they keep coming back!
Create your own personal heatmaps
From your Profile on the Strava website, open your Dashboard and click on Heatmaps. Strava allows users to create up to 10 personal heatmaps.
1. Pick your sport and date range for your heatmap
2. Choose Generate
3. Click View to see your heatmap
To share, move to a region or zoom in to share that particular Heatmap via Facebook and Twitter. Share the URL with a smaller group of friends via email.
How do I build my own route?
- On the Explore Routes page, scroll past the three suggested routes
- Click on the Draw Your Own Route tab at the bottom of the page
- Tap on the pencil icon and get drawing
You can be as detailed as you choose. Almost instantly Strava converts your scribbles into a route.
You can keep adding as you go by re-clicking on the pencil after each line you draw. 
As always, you can choose between sports and map settings in the bottom right corner of the screen. Once you’ve finished just press Done.
How do I save my route?
Whether you’ve drawn your own or are using one of Strava’s suggestions, saving couldn’t be easier. Simply click save once, give your route a name, decide if you want to make it public and whether you wish to sync it up to your devices, before pressing save one final time.
Where do I find my saved routes?
- You’ll need to navigate your way to the My Routes page
- On the Strava App click on the profile tab along the bottom of your screen
- Then scroll down and click on My Routes. All your saved routes appear here
On the desktop, hover over the dashboard option at the top of the page. Then select My Routes from the drop-down menu.
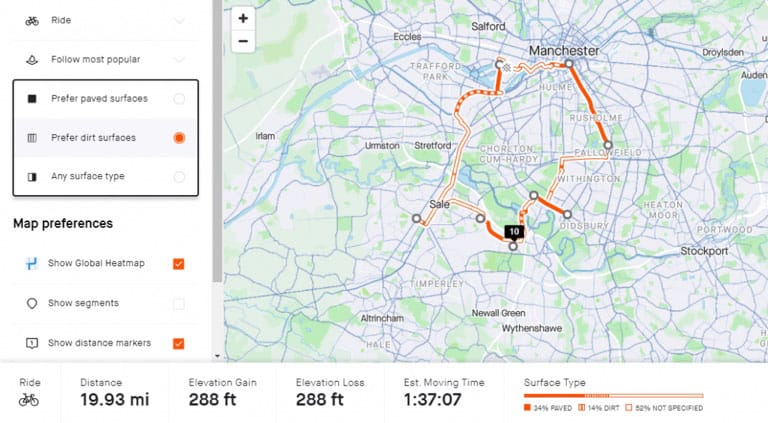
How do I edit a saved or suggested route?
This is where it gets complicated.
All suggested routes need to be saved before you can edit them, and all saved routes can only be edited on Strava’s desktop version.
- Go to the My Routes page and open the saved route you wish to change
- Next, click edit (if you want to amend the route slightly but still keep a copy of the original route, it’s best to click duplicate first)

- Once in the route editor, you can switch between your preferences on the left side of the screen. Choose between sports, surface types, maximized or minimized elevation, and route popularity
- You can also directly edit your route’s path by hovering over the orange track until a white dot appears. Simply drag that white dot over an alternative road and Strava reroutes
- If you make a mistake just press the undo bottom in the top right corner
- And don’t forget to click Save when you’re done!
How do I edit my route in an app like Komoot?
If you’re building a particularly tricky journey you may want to edit your route in a navigational tool like Komoot.
- On desktop click on the desired route on the My Routes page, this opens up the Route Overview
- Next press export GPX to create a GPX file of your route
- Now open a new tab and log into the Komoot website
- Press the ‘+’ sign in the top right and then select ‘Import a GPS File’
- Drag and drop your GPX file, click Next, and then either review your route or save it
How do I use my route?
- On the Strava app click on Profile
- Next, scroll down to the very bottom and click on Routes
- On the route, you want to ride or run press Use Route and then Start
Your phone acts like a car’s Sat Nav so if you’re cycling, make sure you have a suitable mount for your device on your bike’s handlebars.
How do I download my route?
Make sure you’ve got your device plugged into your desktop.
- On the Route Overview page press ‘Export TCX’ (GPX is another acceptable format)
- A TCX file should save onto your desktop
- Simply drag that new file into the correct folder within your device
Use this downloaded TCX (or GPX version) of your route and then upload that file to any device that accepts routes files with these formats.
What about downloading or syncing Strava Routes to Garmin devices?
For a Garmin Edge 520, open the Garmin folder located in the Garmin drive.
Drag your TCX file into the ‘NewFiles’ folder before safely removing your device. Once you’ve switched your device on, check the route has appeared by clicking the course icon.
Any Garmin device that supports Courses also supports Strava Routes!
Use either the Garmin Connect app on your phone or Garmin Connect on your computer and then sync routes from Strava to your Garmin device directly through Garmin Connect.
You need to enable this feature in Settings for Garmin Connect mobile app or via the Garmin Connect website.
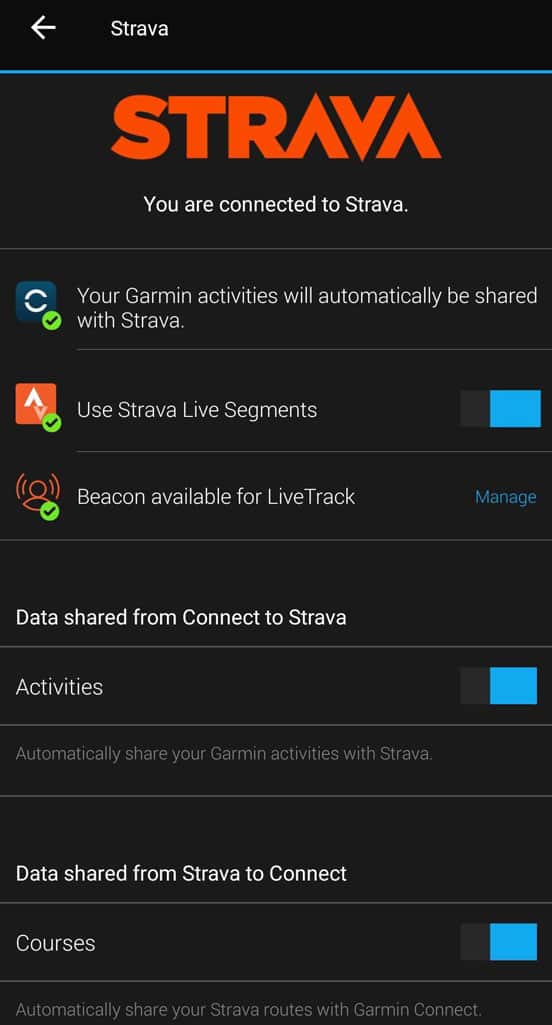
But once you enable the feature, you star your favorite Strava routes in your Strava account and Strava sends them to your Garmin device the next time you sync.
Synced routes from Strava appear in your Courses folder on your Garmin.
Plus, when you access your Strava routes on a Garmin device, you also get access to all of the Garmin features that aren’t available in Strava.
How do I print my route?
On the Route Overview tab click print to open up a cue sheet. Press ctrl+P to load a print preview. Then print the web page to your printer.
On both the app and desktop click on your route from the My Routes page.
Then click share to send to a friend on Strava. To share on Facebook, Twitter, and email, click the corresponding icons next to the share button.
How do I use someone else’s route?
If you’re on the Strava dashboard and see a friend’s route you like the look of, click on their activity to get to the overview page.
Then press the three dots just below segments on the left. Next, press Create a Route and Strava uploads your friend’s path to the route editing page. There, you can change up their route to suit you. Click save when you’re done, and the route is then filed in My Routes.
Summary
Using Strava’s Routes is a great way to discover new paths for running, walking, and riding while at home or on the road.
Using data collected from the Strava user community, Strava Routes gives you recommendations and suggestions within seconds–which you can follow exactly or change up.
You can then share your current location and route details in real-time with friends and family or share the entire route once completed.
And if you really enjoyed the route, Strava lets you save it for another day. Simply save it to your My Routes page for easy access at any time.


