
If you use your Fitbit to track your rides and hop on your bike and start riding, you probably discovered, much to your disappointment, that your Fitbit didn’t show many of your ride’s stats or a map of your route.
In particular, if you’re looking for average speed and distance, you won’t find it when using Fitbit’s auto-recognize exercise feature. And the reason is simple: it doesn’t turn on GPS!
So, if you’re frustrated with your Fitbit when biking outdoors, this article walks you through how to use your Fitbit, so you get all your cycling stats.
Contents
- 1 How Fitbit tracks exercise automatically
- 2 How do I track my cycling distance with my Fitbit?
- 3 Can my Fitbit track indoor cycling?
- 4 Are you still having problems tracking distance with your Fitbit? Check out our top 7 tips!
- 4.1 1. Disable SmartTrack for Outdoor Bike workouts
- 4.2 2. Turn Auto Pause mode off and on
- 4.3 3. Always allow location access
- 4.4 4. Turn off battery saver or low power modes on your phone
- 4.5 5. Check your Fitbit placement
- 4.6 6. Screen lock and timeout setting
- 4.7 7. Try changing your main goal to distance.
- 5 Summary
Related reading
- Fitbit not accurately counting or tracking steps? Let’s fix it!
- Learn to set high and low heart rate notifications on your Fitbit Sense, Versa 3, or Charge 5
- How to set up and use Fitbit snoring detection features
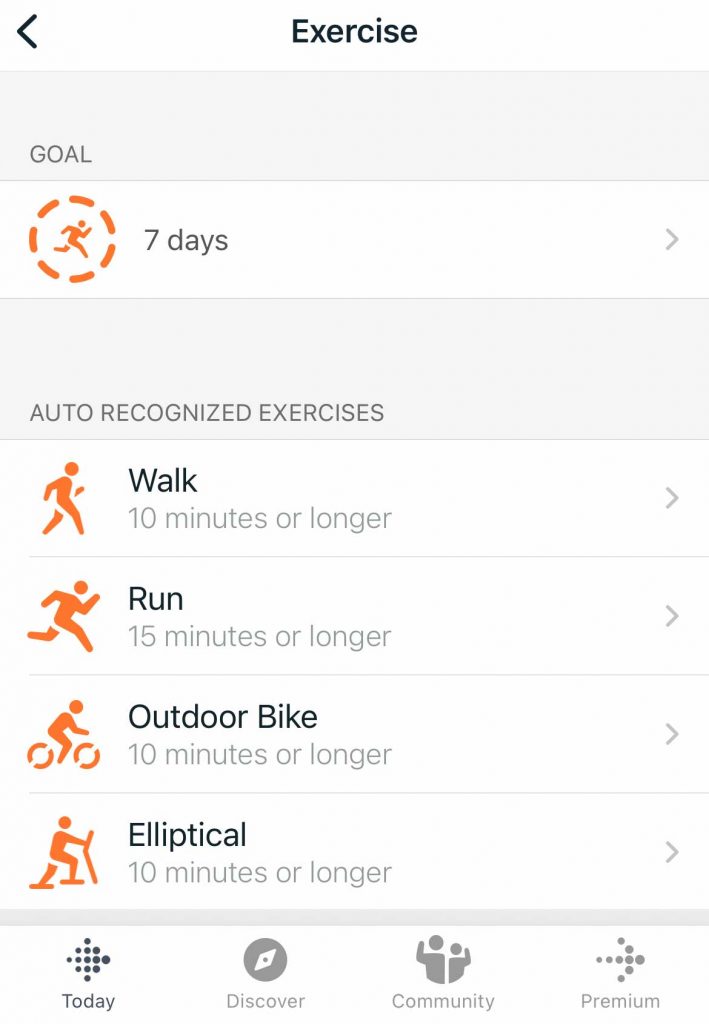
How Fitbit tracks exercise automatically 
Fitbits track your bike rides (and other auto-recognized activities) using a technology called SmartTrack, which automatically recognizes and records any high-movement activities and types it as a specific type of workout.
Most Fitbit devices feature SmartTrack. This feature sends you a notification that your exercise was auto-recognized once you engage in a supported exercise for approximately 15 minutes (you can adjust this duration in the Fitbit app.)
Unfortunately, SmartTrack doesn’t work well when biking (and many other exercises) because GPS is off, and consequently, it cannot record distances.
So, to get accurate ride information, you should never use the auto-recognize feature for biking and instead use the Exercise app, which allows GPS. 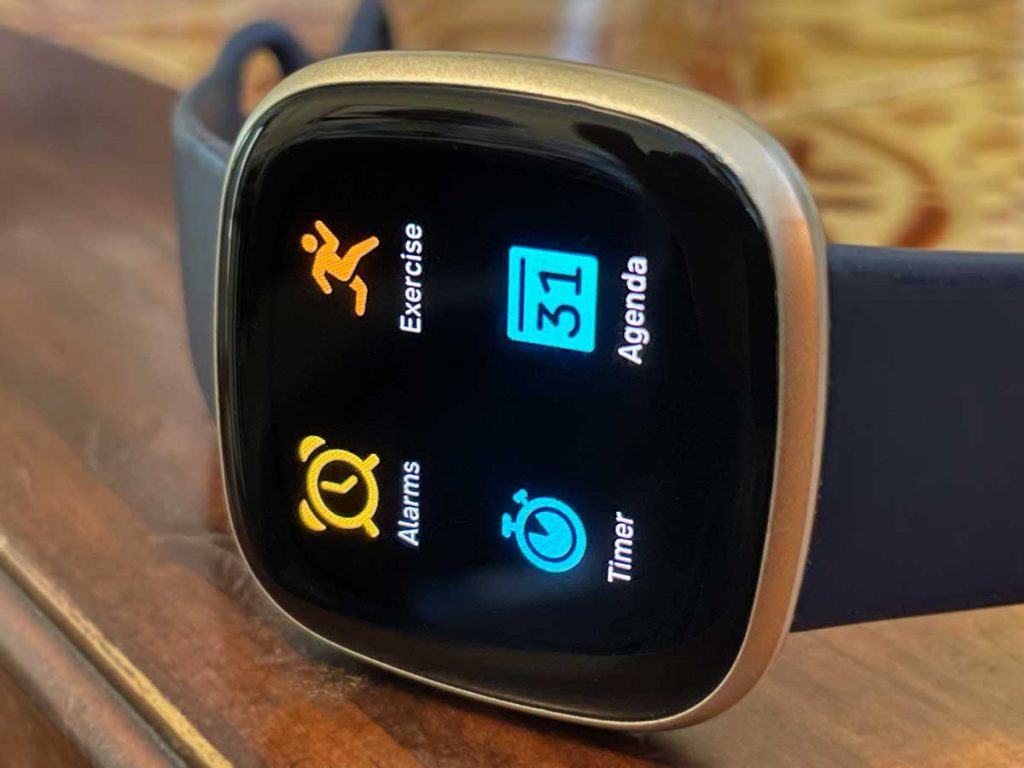
How does Fitbit track the distance you have cycled?
Because the tracker on your arm has no way to know what the wheel of your bike is doing, your Fitbit needs to get the bike’s distance another way. That means your Fitbit needs to use GPS–either built-in or using the GPS from your paired phone (called Connected GPS.)
Unfortunately, only specific Fitbit models, such as the Charge 4+, Sense, Ionic, and Versa 3, have built-in GPS.
Most other Fitbits depend on your phone’s GPS–for these models; it’s best to carry your phone with you when riding if you want distance and speed stats. 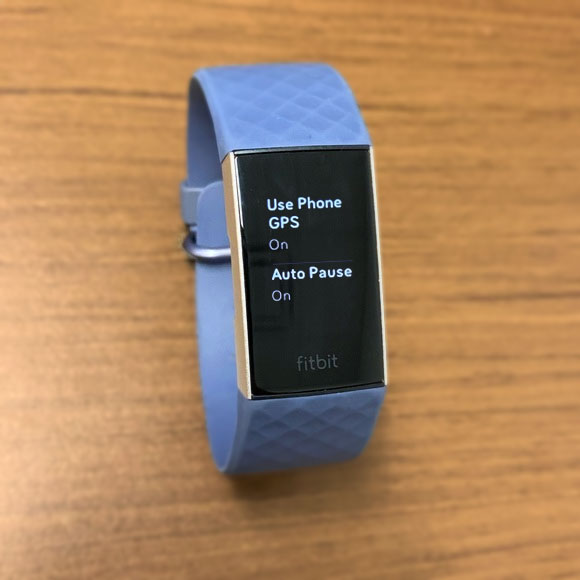
To use connected GPS from your phone, make sure both GPS and Bluetooth are enabled on your phone.
How do I track my cycling distance with my Fitbit?
It might sound counter-intuitive, but you should not simply wait for your Fitbit to auto-recognize that you’re going for a bike ride.
When your Fitbit auto-recognizes a bike ride, it does not turn on GPS and consequently, you won’t get distance and route information.
If your Fitbit device can connect to GPS (via your phone or built-in), you should use Bike mode in the Exercises app on your Fitbit to track activity and get a map of your route. 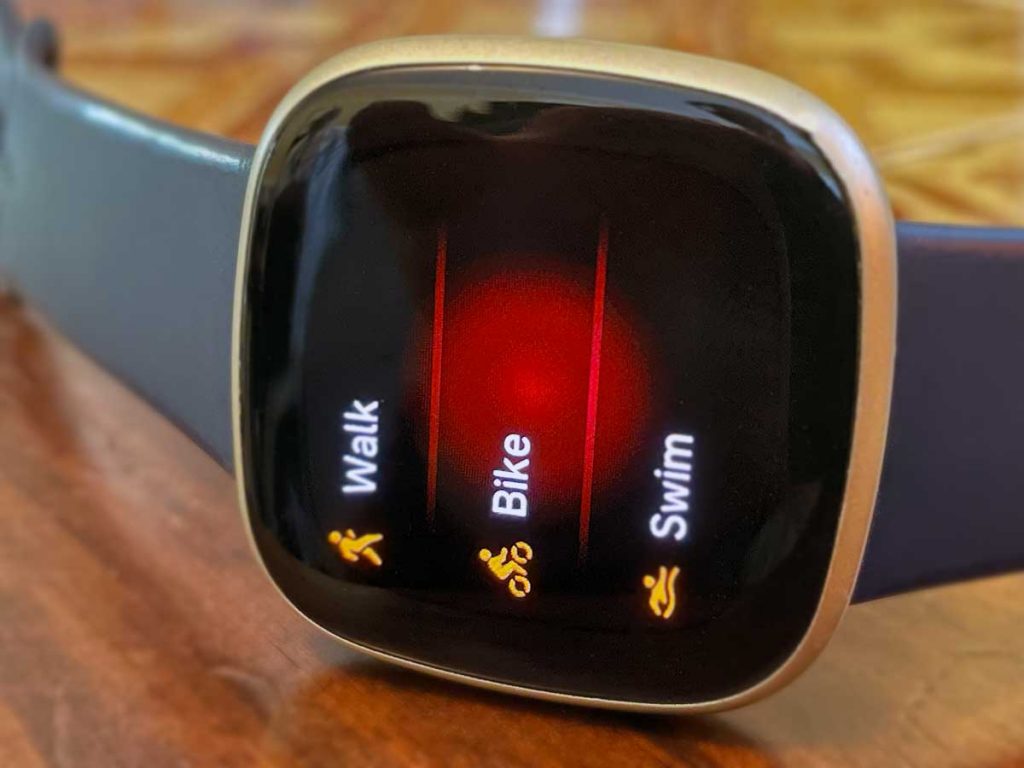
Follow these steps to ensure your Fitbit records your bike ride distance before starting your ride:
- Sync your Fitbit with the Fitbit app on your phone a few seconds before you start the ride. Syncing is especially important for Fitbits that use their paired phone’s GPS to track their ride’s route.
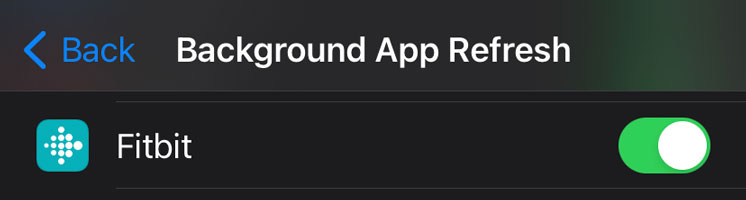
- For Fitbits that use their phone’s GPS, check that you allow the Fitbit app to Background App Refresh and that the Fitbit app has permission to access your location.

- For Fitbits that use their phone’s GPS, check that you allow the Fitbit app to Background App Refresh and that the Fitbit app has permission to access your location.
- On your Fitbit, open the Exercise app and tap Bike.
- On some models, scroll down and make sure GPS is on.

- On some models, scroll down and make sure GPS is on.
- Wait for your Fitbit to confirm that GPS is connected. Look for an active GPS icon or notification on your Fitbit’s screen–this should show throughout your ride.

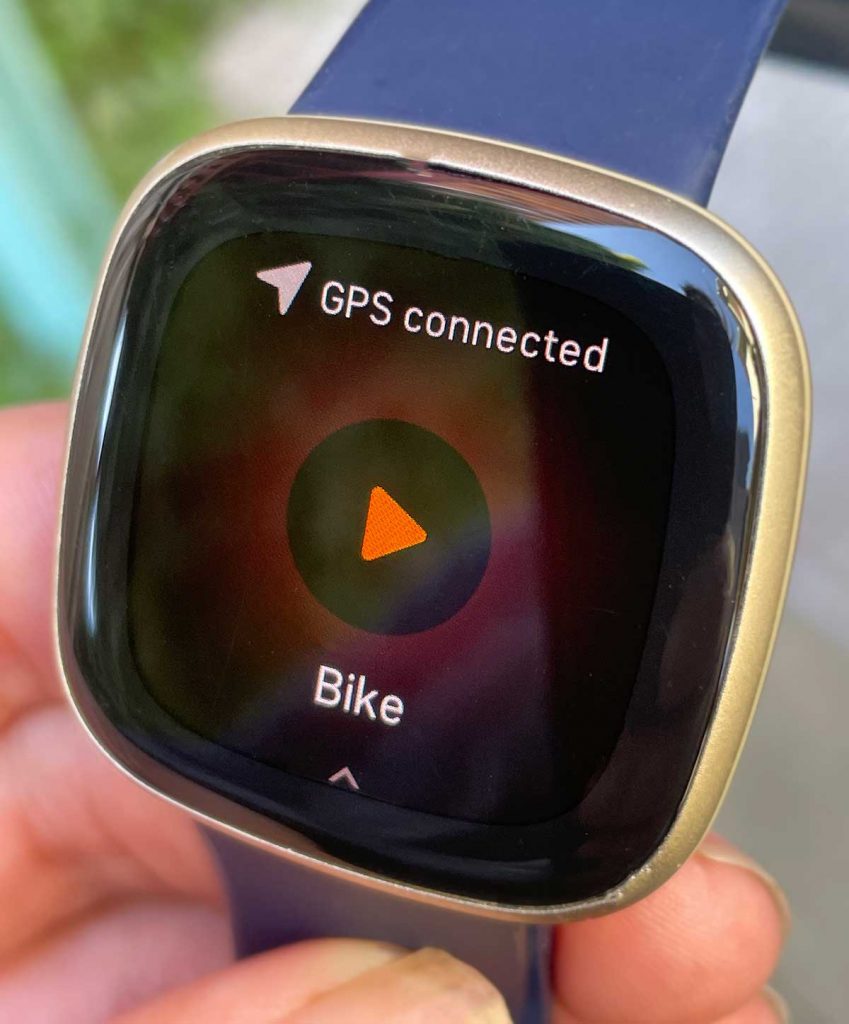
Once GPS shows it connected, tap the play button and get moving!
Unfortunately, you won’t see your biked miles or kilometers counting toward your daily distance goal. Currently, only step-based activities like running or walking count toward that daily distance. So biking, along with swimming and other activities, don’t show up there.
Can my Fitbit track indoor cycling?
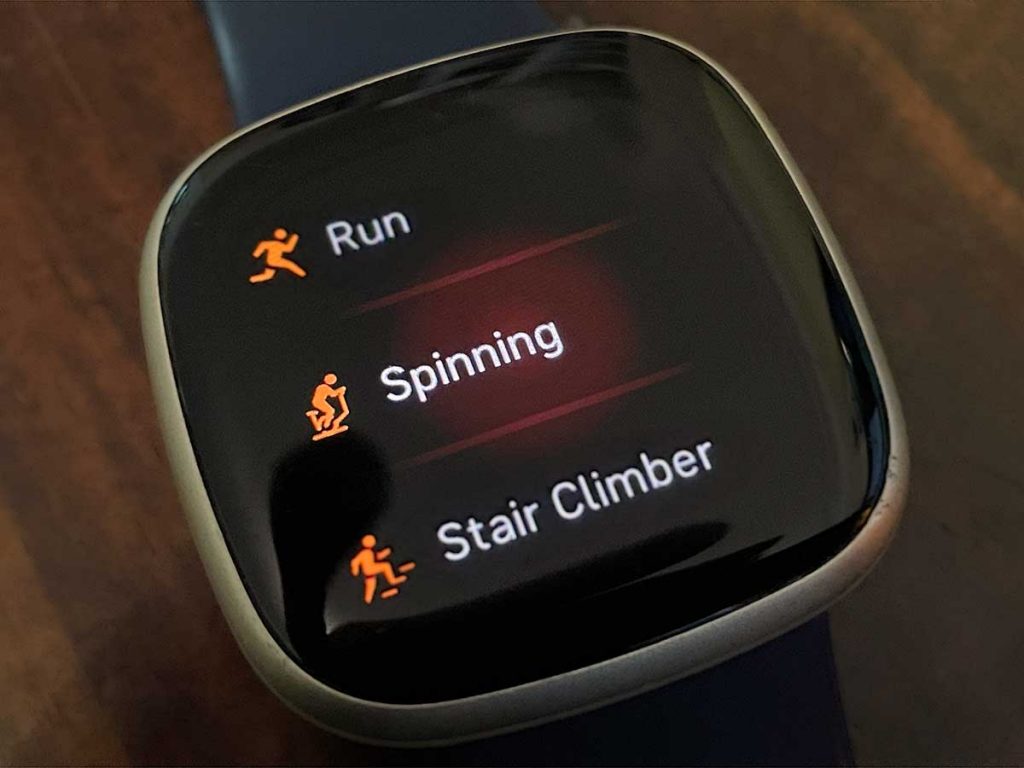
Yes, you can record indoor stationary bike cycling workouts using the Exercise app, then select Spinning. However, you must manually choose this exercise mode. At this time, Fitbits cannot automatically detect that you’re cycling indoors.
Spinning is essentially the same workout as the Bike exercise, just without GPS. But Spinning does still measure your workout duration, heart rate, active zone minutes, and calories burned while cycling indoors. 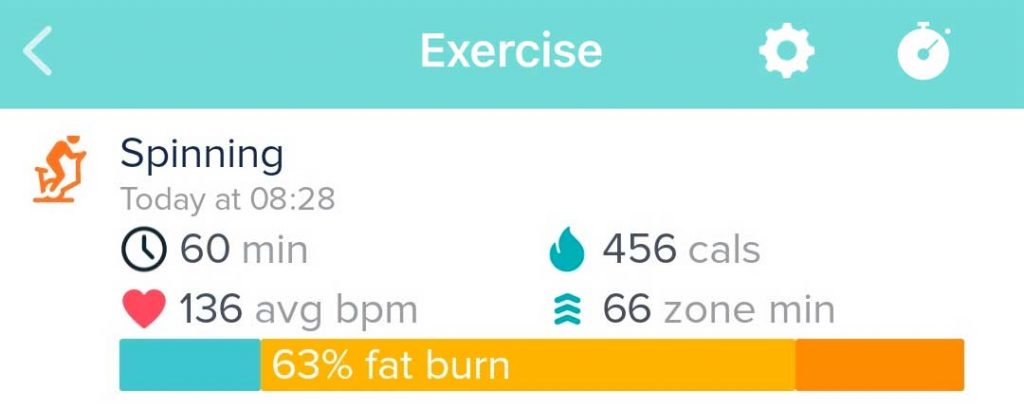
Another option is to use Bike mode but turn off GPS–you get the same stats as Spinning, and then if you want, manually enter your distance from your bike.
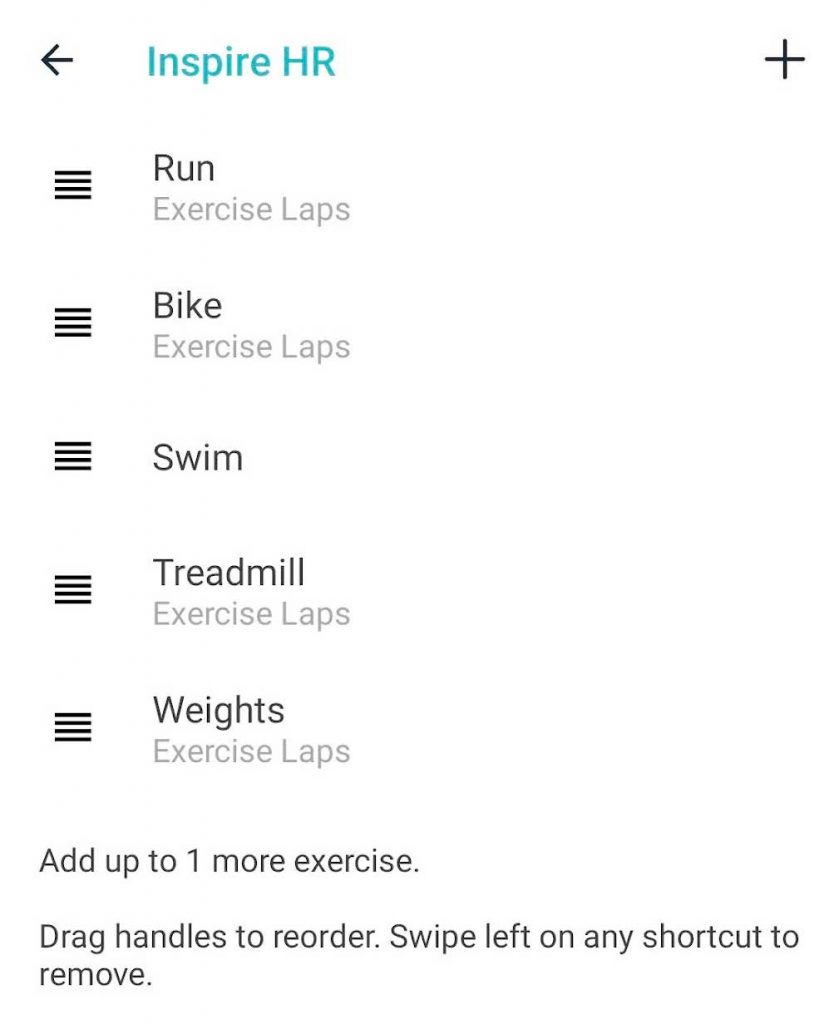
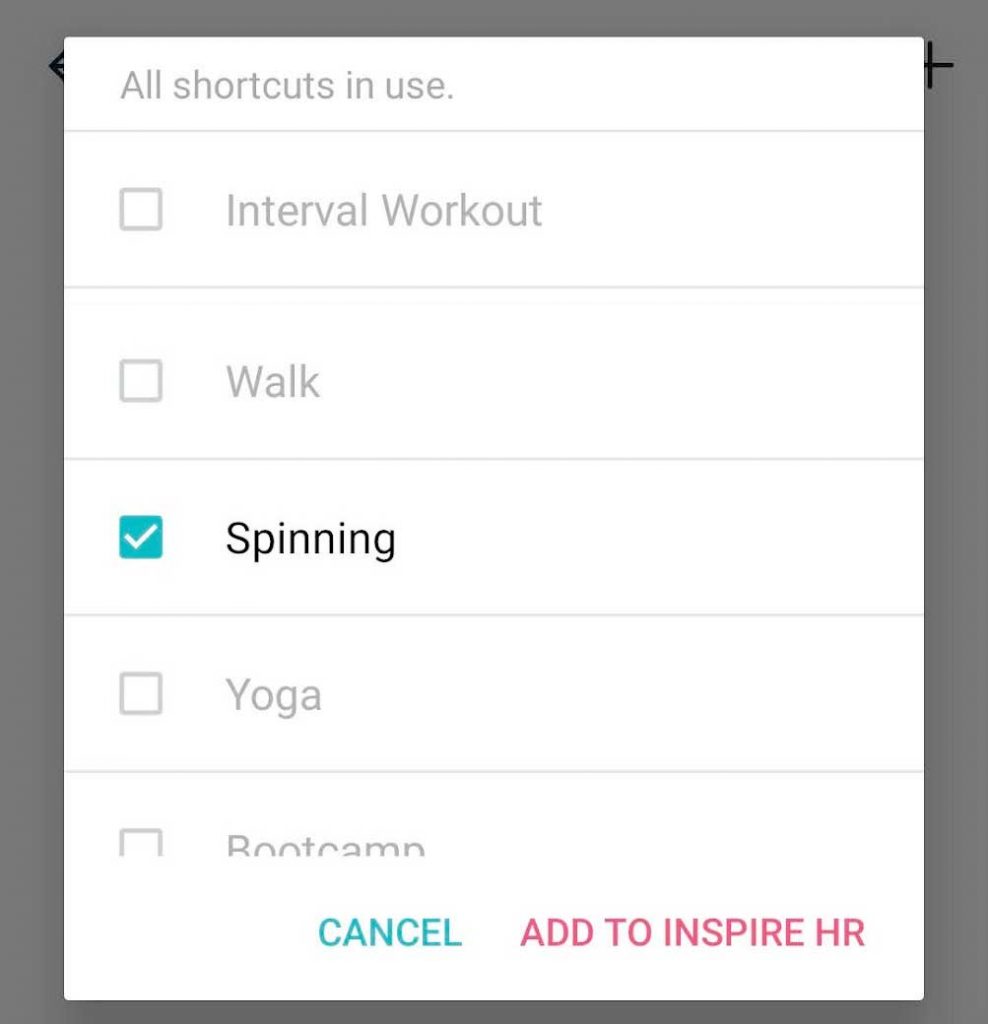
If you don’t see Spinning as an exercise option, open your exercise shortcuts in the Fitbit app and add Spinning to your exercise shortcuts.
- Tap the Devices icon > your Fitbit > Tracker or Watch preferences.
- Scroll down and tap Exercise Shortcuts.
- Many newer models don’t have an exercise shortcuts option.
- To add a new exercise shortcut, tap the Edit button, the plus sign (+), or remove one by swiping left on a shortcut and tapping Delete. You can also reorder the exercise shortcut options by dragging them up and down the list.

- If you don’t see the + sign, delete one of the workouts shortcuts–swipe left on a shortcut to remove it.
- Select Spinning and choose the button to add it to your Fitbit.

- Make sure you sync with your Fitbit to update any changes you made to your exercise shortcuts.
Are you still having problems tracking distance with your Fitbit? Check out our top 7 tips!
1. Disable SmartTrack for Outdoor Bike workouts
To be sure that you are starting your activities manually, you can disable SmartTrack (specifically for bike rides).
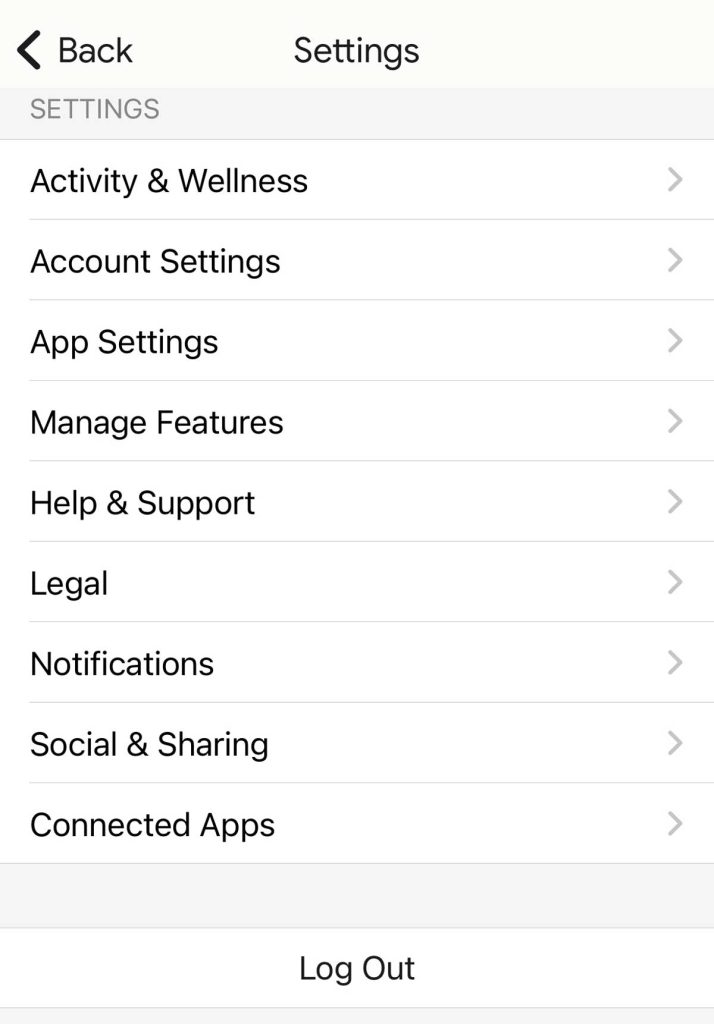
To do this, go to the Fitbit app:
- Tap the Settings app at the top or tap your account icon > Settings.

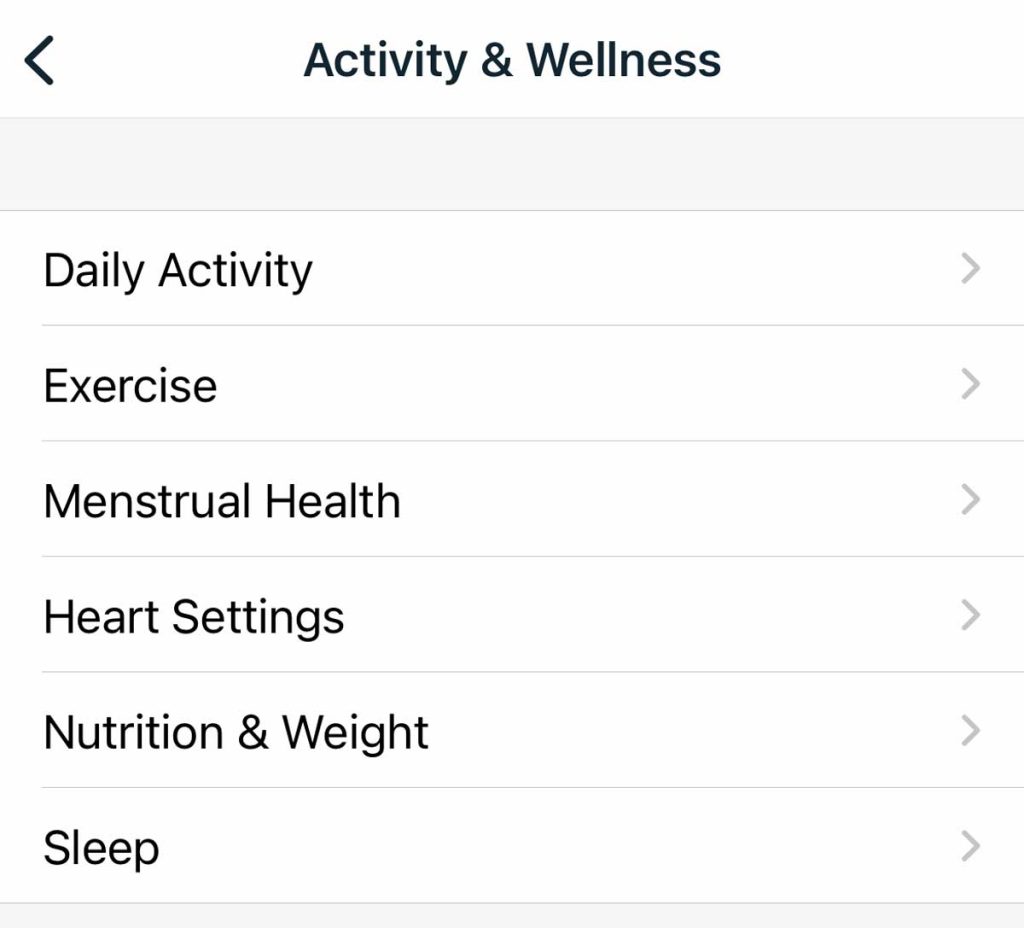
- Choose Activity & Wellness.

- Tap Exercise.

- Under the Auto Recognized Exercises section, select Outdoor Bike.

- Toggle off Auto-Recognize to disable it.


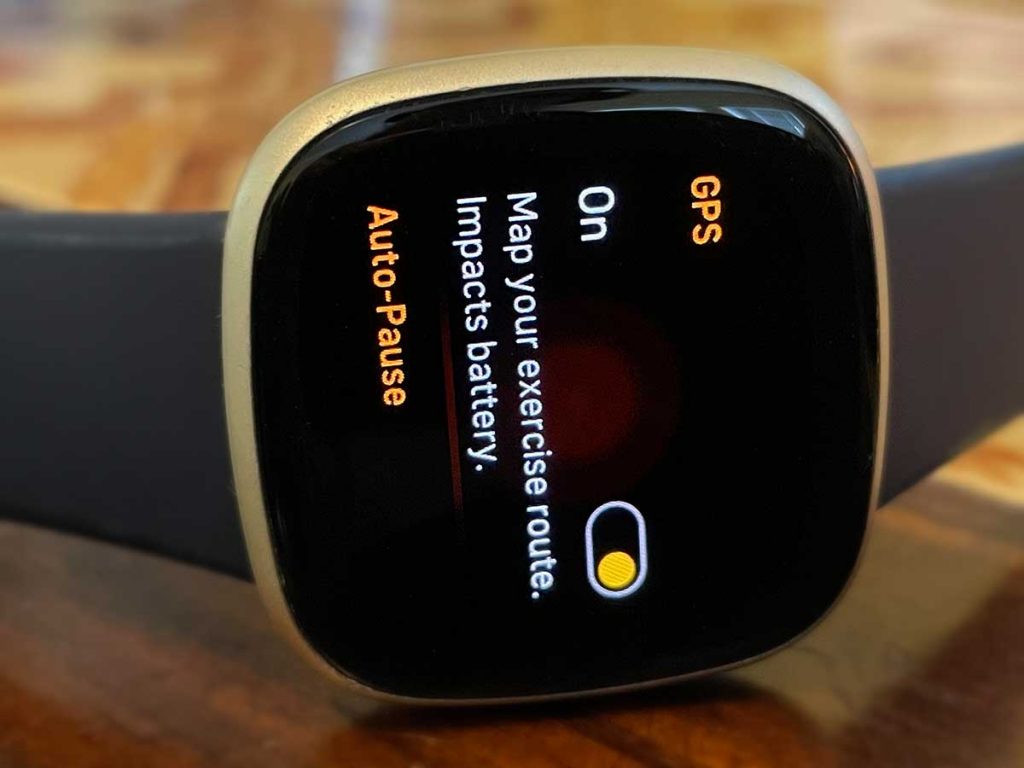
2. Turn Auto Pause mode off and on
Some people have found that toggling autopause off and back on solved their distance tracking problem.
If autopause is turned off by default, tracking does not automatically resume when you pause during your ride. Hence the rest of the ride is not tracked. Turning on the auto-pause mode should track your exact miles.
Toggling this setting off and on can fix issues if this feature isn’t working properly.
To turn on auto-pause:
- On your device, open the Exercise app.
- Tap Bike.
- Find Auto-Pause and toggle it off and then back on. If it’s already off, just toggle it on.
- Start your workout.

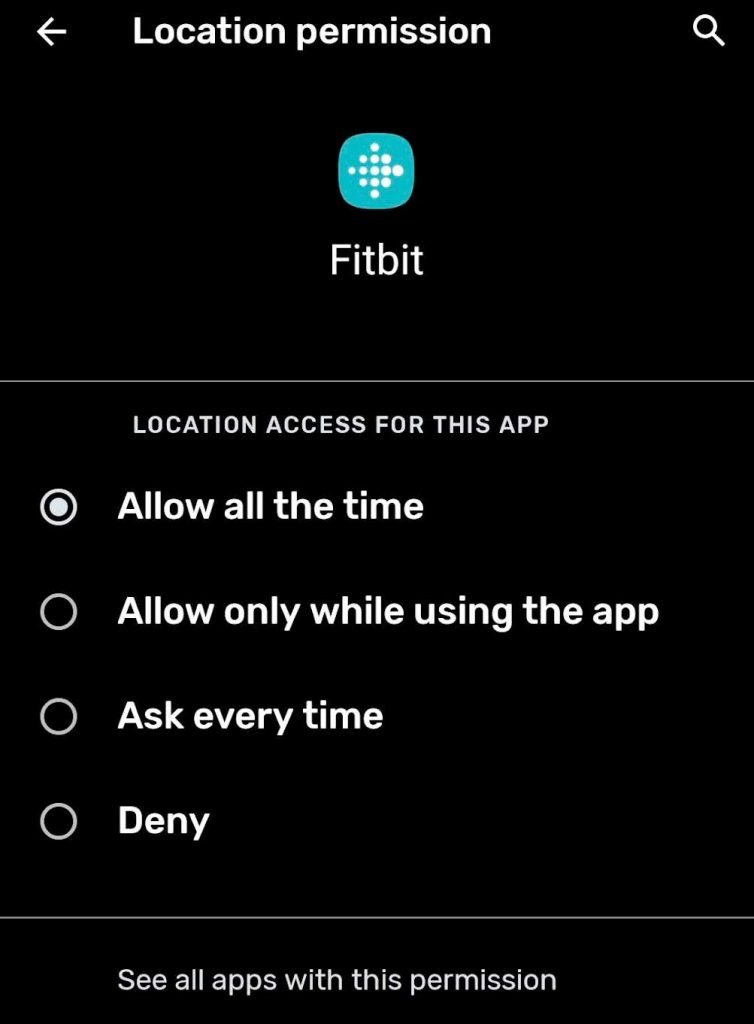
3. Always allow location access
Make sure your app has permission to access your phone’s location (GPS) all the time rather than when using the app.
To do this, on your Apple phone, go to:
- Settings > Fitbit > Location.
- Choose Always instead of While Using the App. For iPhones, also turn on Precise Location.


Some Android releases over the past year have changed the default behavior for newly installed apps, only to allow GPS usage while the app is active. So, after starting your ride, if you put your phone in your pocket or bag, the phone puts the Fitbit app to sleep, and the permission to use the GPS ends.
This is why some people may be experiencing very short ride distances recorded, where only the first minute or so is it captured.
To do this, on your Android phone, go to:
- Settings > Apps > Fitbit.
- Tap Permissions > Location and choose Allow all the time.

4. Turn off battery saver or low power modes on your phone
If you connect your Fitbit to your phone for GPS information, ensure the low power mode or power savings mode is off.
On Android devices, this setting might be called a variety of things, including Power Saving, Battery Saver, or Power Optimizer Mode.
Open your phone’s Control Center and tap off low power mode to turn it off. Or open Settings > Battery and turn off Lower Power Mode or Battery Saver. 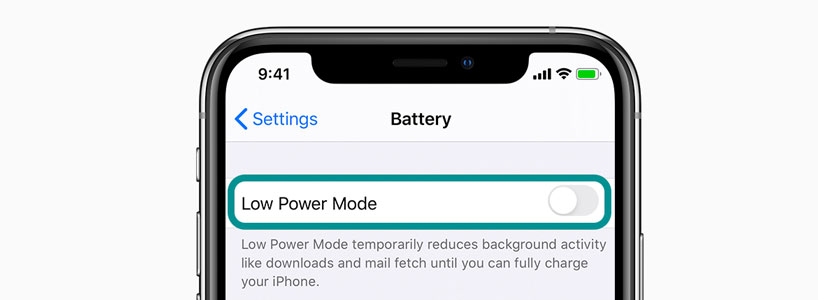
On Android, there is an additional setting for apps called Battery optimization. 
- Open Settings > Apps > Fitbit > Advanced > Battery and turn off Battery optimization so it’s not optimized.
5. Check your Fitbit placement
Make sure that your Fitbit is neither too loose nor too tight around the wrist. Wear the band loosely enough that it can move back and forth on your wrist.
- Wear your device on top of your wrist. The back of your device should be in contact with your skin for features such as heart-rate tracking.
- Make sure that your band isn’t too tight. Wear it loose enough that it can move back and forth on your wrist.
- During exercise, try moving the band higher on your wrist (2-3 finger-widths above your wrist bone) to get a better fit so that it’s secure but not too tight. Lower the band on your wrist and loosen it after exercise.
- Try wearing your Fitbit on the inside of your wrist. This is especially useful if you have tattoos or have a lot of arm hair (you could also shave your hair but wearing it on the inside is a lot easier!)
6. Screen lock and timeout setting 
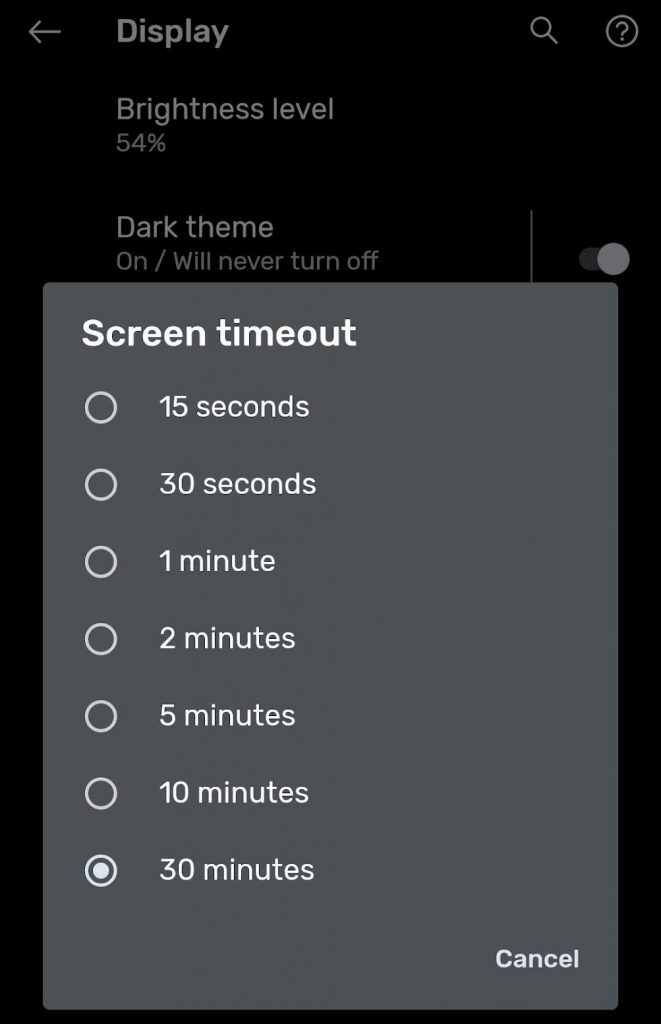
Some people may find that their GPS disconnects when their phone screen display times out.
If this is the case, try changing your phone settings for your display never to time out or set a more extended screen timeout duration.
- On iPhone, go to Settings > Display & Brightness > Auto-Lock.
- On Android, go to Settings > Display > Avanced > Screen timeout.
Changing your screen’s timeout setting uses a lot of battery life, but you should have all of your bike data following your ride.
7. Try changing your main goal to distance.
Some people report that changing their main goal to distance helped them solve their tracking problem. To do this:
- Open the Fitbit app and choose Devices icon > your Fitbit device.
- Scroll down and tap Main Goal.
- Change the main goal to Distance.

- Sync with your device to save these settings.

Summary
I hope that this article helps you understand how your Fitbit measures your distance cycled, how you can record your distance cycled, and helps you solve problems tracking your distance.
If you have any more questions or anything to add, please feel free to let us and everyone else know about it in the comments section down below!
If you liked this article, you can follow us on social media by using the social media buttons!


I selected ‘Bike’ and when finished , the map shows up on my app under exercise, with the correct route that I covered. The problem is that the distance was probably about 7km yet the fitbit advises a distance of only .35km. It does this for every ‘bike’ selected exercise I do. Your article is clear but it does not fix this issue for me.
OK. but steps are not the same as distance and I’m not suggesting bike distance be calculated as steps. There should be a daily distance total that includes biking. It would expand Fitbit’s potential customer base many folds!
Hi Lorraine,
I agree with you completely! Daily distance should include all distances reached by any method–and then break it down by type (step, bike, swim, etc.)
Sadly, I don’t have much hope that Fitbit (now owned by Google) will make this change anytime soon.
My Versa 3 tracks my bike ride and gives distance stats in “track my activities” but does not add distance ridden to my distance total on the dashboard.
Nothing I have read here tells me how to add those riding kilometers to my daily distance. I want to know. I work hard on my rides.
Hi Lorraine,
Unfortunately, Fitbit’s daily distance stat includes only step-based activities like walking and running. Biking distance is not included in their daily distance, not is swimming and many other activities that cover distance.
From our understanding, counting only step-based activities in the daily distance metric was a feature suggested by Fitbit users in the past.
There is a request from some users in Fitbit’s Suggestion board to add all activities to the daily distance goal. However, this suggestion is currently listed as not planned.