
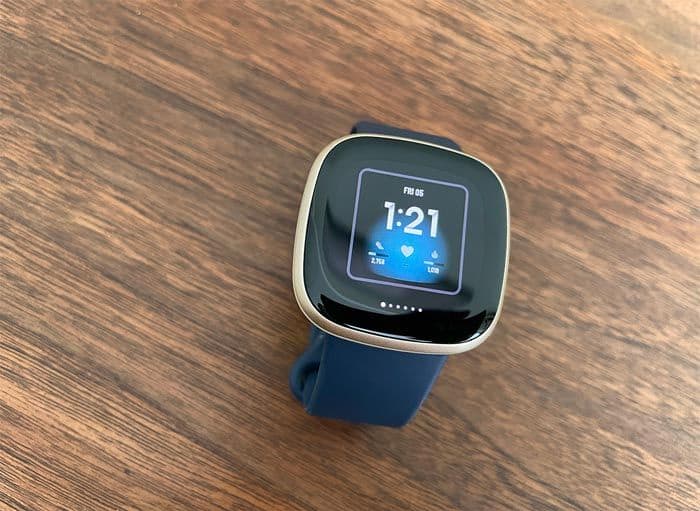
Choosing a Fitbit clock face reflects your mood, style, and personality. And it can also help to keep you on track with your day’s fitness goals!
Unfortunately, many people experience issues when changing their Fitbit’s clock faces.
If you receive error messages such as unable to install: install failed, please try again later, or your Fitbit displays Clock Error; you are not alone!
Hopefully, these quick fixes banish those error messages, and you can install a clock face of your choice.
Contents
- 1 In a hurry?
- 2 Try these tips when your Fitbit isn’t changing its clock face
- 3 Restart—everything!
- 4 Review your Fitbit’s saved clock faces
- 5 Not seeing a clockface at all? Change to a Fitbit one
- 6 Plug both your Fitbit and your phone into their chargers
- 7 Force close the Fitbit app
- 8
- 9 Update your Fitbit’s firmware
- 10 Remove and re-add your Fitbit
- 11 Uninstall and reinstall the Fitbit app
- 12 Check your Fitbit’s storage space and remove anything unused or not needed
- 13 Check the clock face’s permissions
- 14 Factory reset
- 15 FAQ
- 16 Summary
In a hurry? 
Try these tips when your Fitbit isn’t changing its clock face
- Restart everything.
- Review your Fitbit’s saved clock faces.
- Change to a Fitbit-branded clock face.
- Plugin and charge both Fitbit device and phone.
- Force close the Fitbit app and reopen.
- Update your Fitbit’s firmware (operating system.)
- Remove and re-add your Fitbit.
- Uninstall and reinstall the Fitbit app
- Check your Fitbit’s internal storage.
- Check clock face permissions.
- Turn on always connected or on all-day Sync (for legacy app versions and devices.)
- Unpair Bluetooth.
- Factory reset.
Before we go into detail on each suggestion, remember that for most Fitbit smartwatches to update the clock face on your watch, you must have no more than 38 apps installed.
Also, Fitbit watches allow you to save up to 5 total clock faces and switch between them.
If you try to add another, you must delete one of your saved clock faces and add your newest!
Related reading
- How to change the stats showing on your Fitbit’s clock face
- Fitbit doesn’t turn on clock when you tap it? Screen wake not working? Let’s fix it!
- Fitbit not connecting to Wi-Fi? Try these steps
Restart—everything!
You hear it all the time for almost all technology products–try a restart!
Well, it’s true for Fitbits, too. So before you spend a lot of time troubleshooting, perform a restart of both your phone (tablet, computer) and your Fitbit device.
You may need to try multiple restarts if the issue isn’t solved the first time. 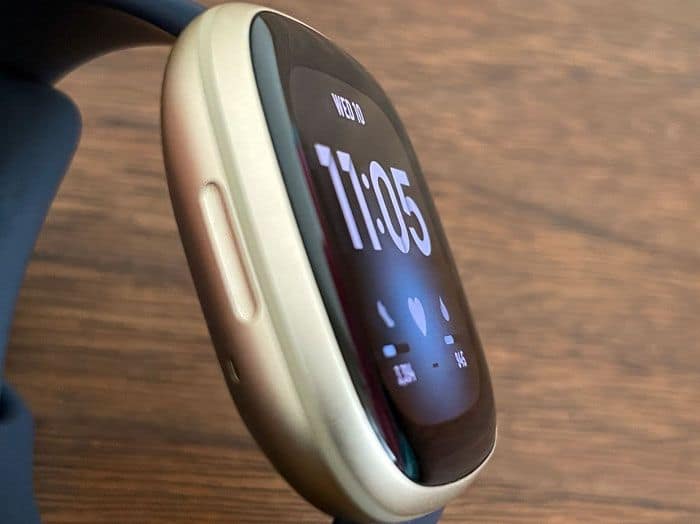
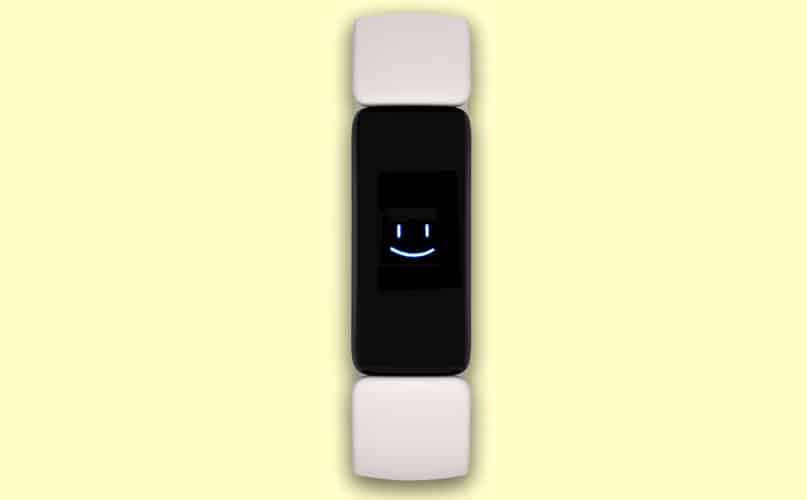
You can restart most Fitbits via the Settings app or hold the side button(s) until you see the Fitbit logo or a smiley face on its screen.
For older Fitbit wearables
- Connect your Fitbit to its charging cable and make sure it’s plugged in and placed correctly.
- Hold down the button for between five & ten seconds. You usually see the Fitbit logo or a smiley face icon appear, or the screen flashes.

- Release the button or buttons when this happens.
- Disconnect the tracker from its charger and turn it back on if necessary.
To see the exact instructions for restarting/rebooting your Fitbit, check out this article: Do you need to restart or reset your Fitbit device? Learn the steps.
Restarting your phone is usually a simple power it off, wait 20 seconds, and power it back on.
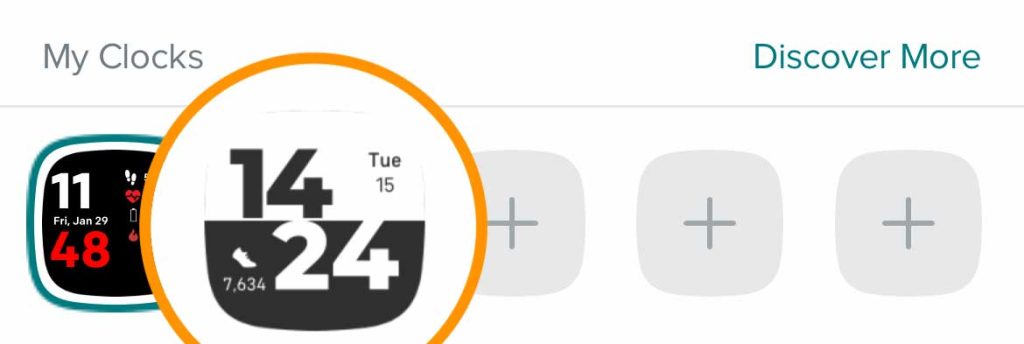
Review your Fitbit’s saved clock faces
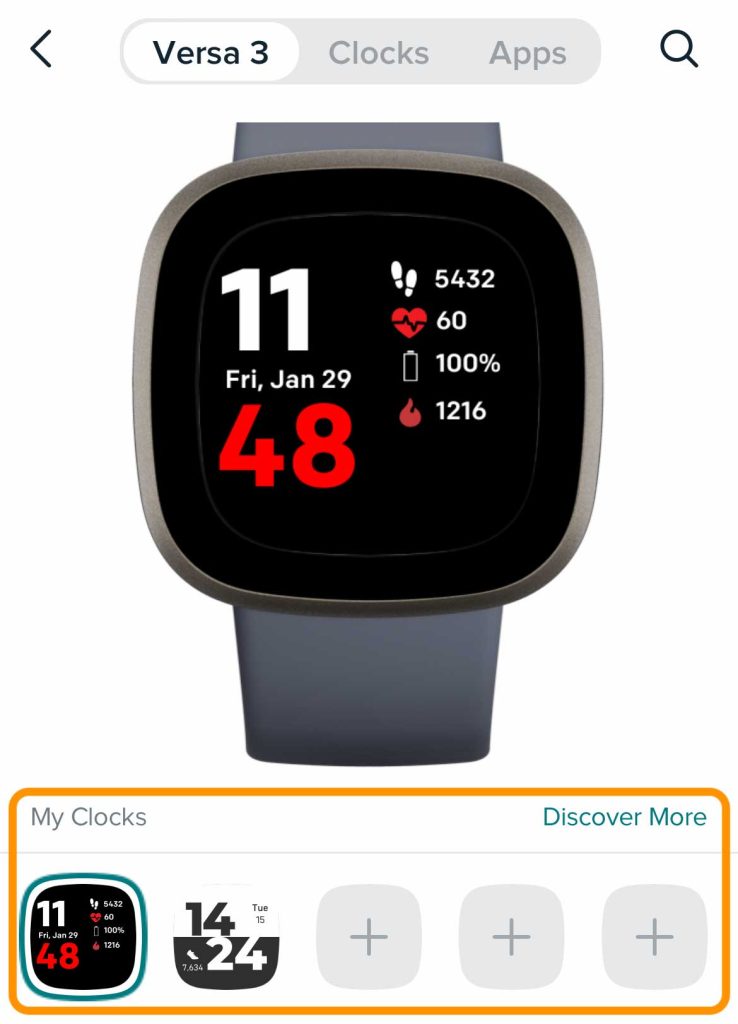
- On your Fitbit smartwatch, open the Clocks app

- Swipe left or right on the bottom row of dots to see your 5 saved clock faces.

- If you find the one you want to use, switch by tapping it.
- Only Fitbit watches offer the Clocks app.
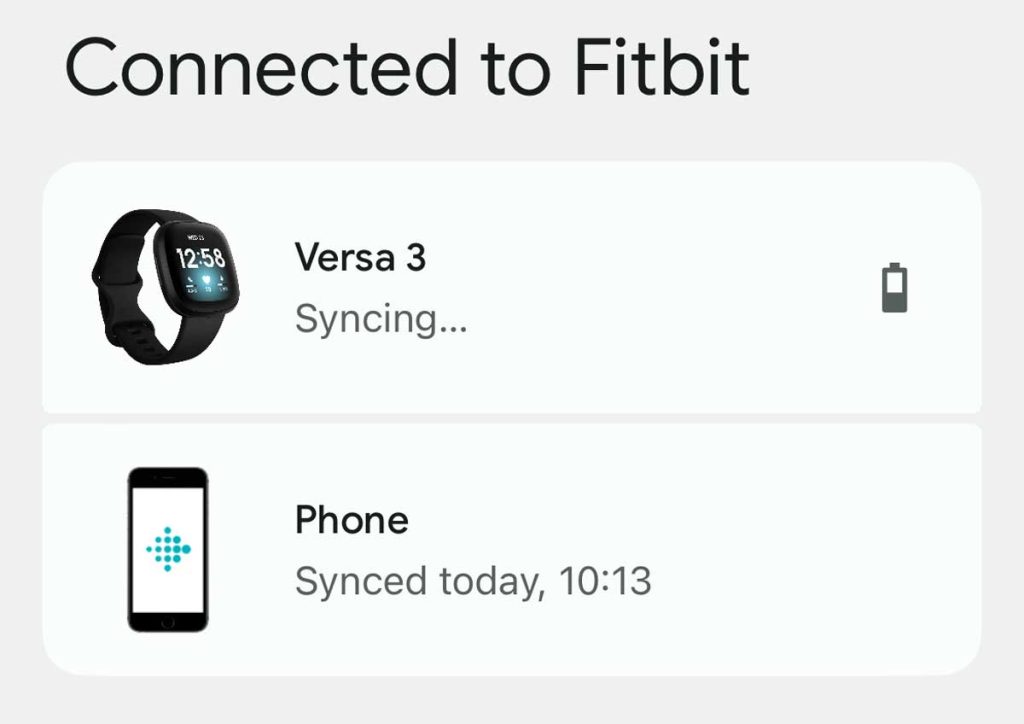
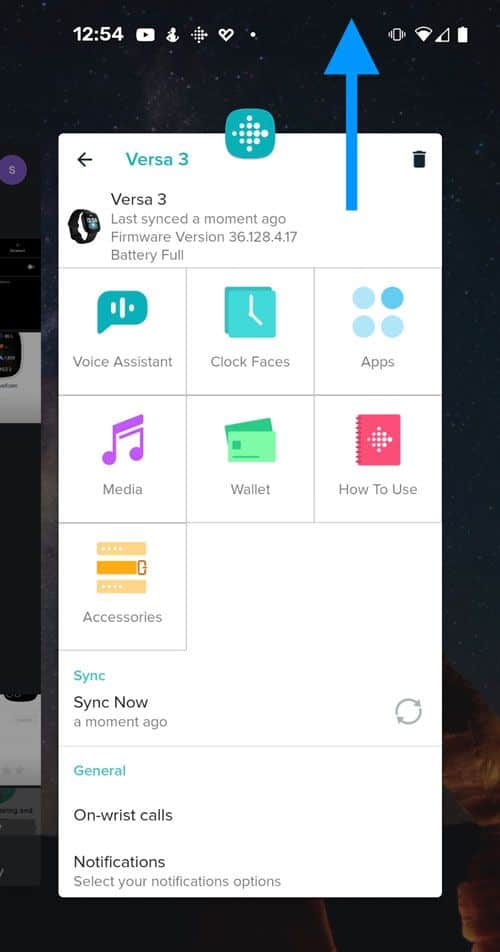
- In the Fitbit app, tap the Devices icon at the top left.

- Under Connected to Fitbit, choose your Fitbit model.

- Under Connected to Fitbit, choose your Fitbit model.
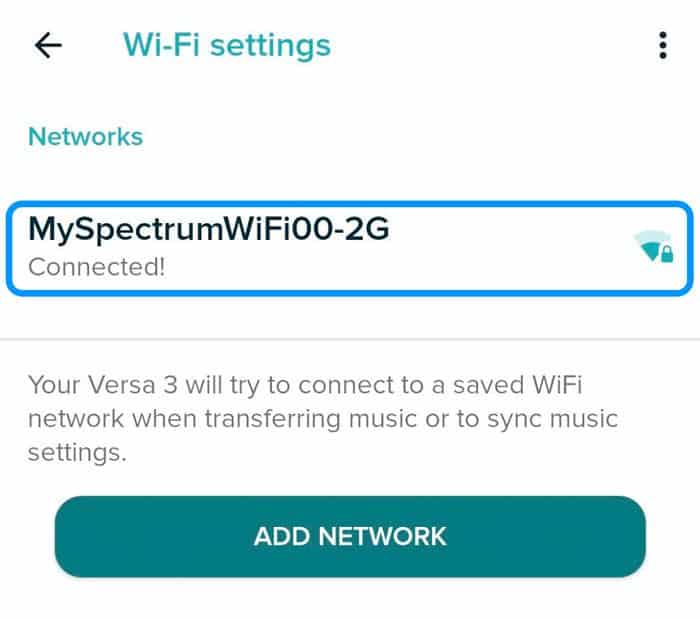
- For Fitbits with WiFi, check that your Fitbit is currently connected to WiFi.
- If not, scroll down on your device settings and tap Wi-Fi settings.
- Tap a listed network or add a new network and verify that your device lists that it is Connected!.

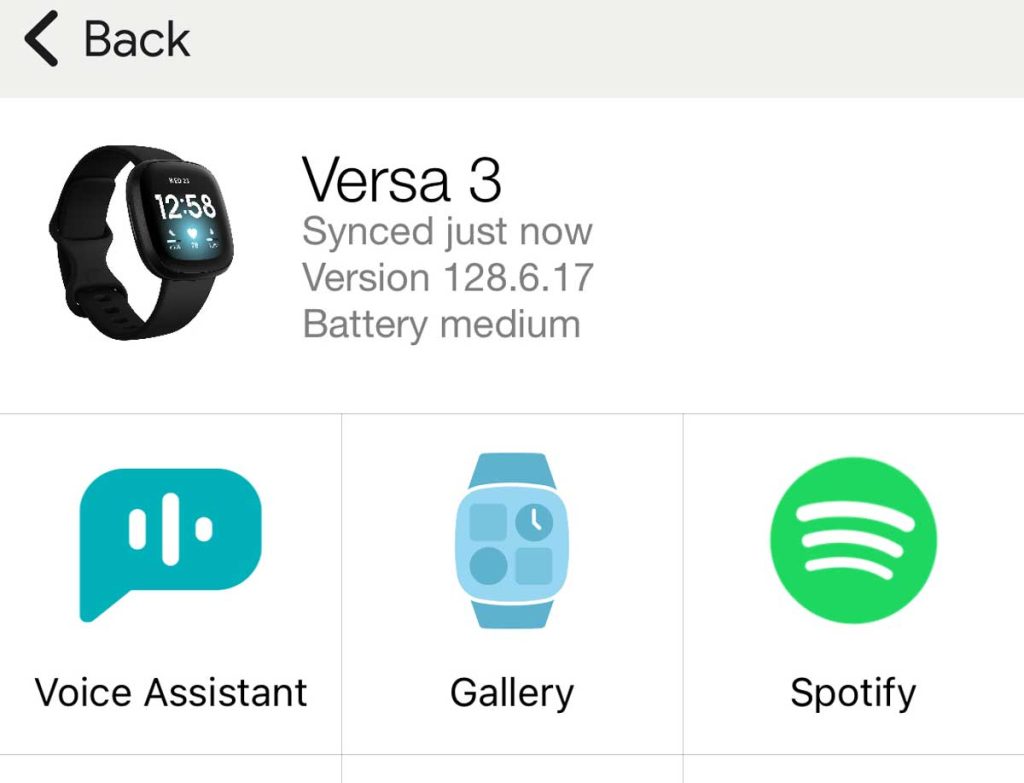
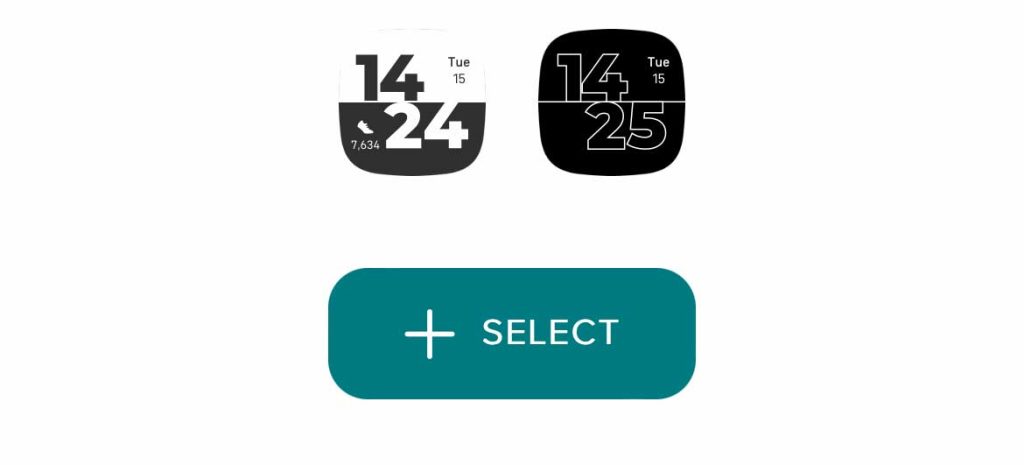
- Open the Gallery tile (for older versions, tap Clock Faces.)

- For watches, please scroll down and scroll down to My Clocks (or My Active Clock.)

- To switch to a saved clock face, tap the clock face.

- Press Select.

- Wait for it to download and update on your device, then tap Done.
- If it doesn’t update to your device, force a sync using the Sync Now feature.
- If it fails, check that your device is connected to WiFi again.

For Fitbit trackers, review your current clock face and switch to a different one
- In the Gallery, choose the Clocks tab at the top.

- Select a clock face to see its details.
- Tap Install to add the clock face to your Fitbit tracker.

- Wait for your tracker to update its face. If it doesn’t update, sync with the Fitbit app.
Remove a saved clock face from your Fitbit (watches-only feature)
If you already have five clockfaces installed on your Fitbit, you can remove a clockface to make room to add another one.
When you remove a saved clockface, any personalization or settings changes you made to it are also lost.
- Open the Fitbit app. Tap the Devices icon > your Fitbit > Gallery.
- Scroll down and review your saved clock faces in My Clocks.
- Tap a saved clock face, select Remove clock face, and confirm.

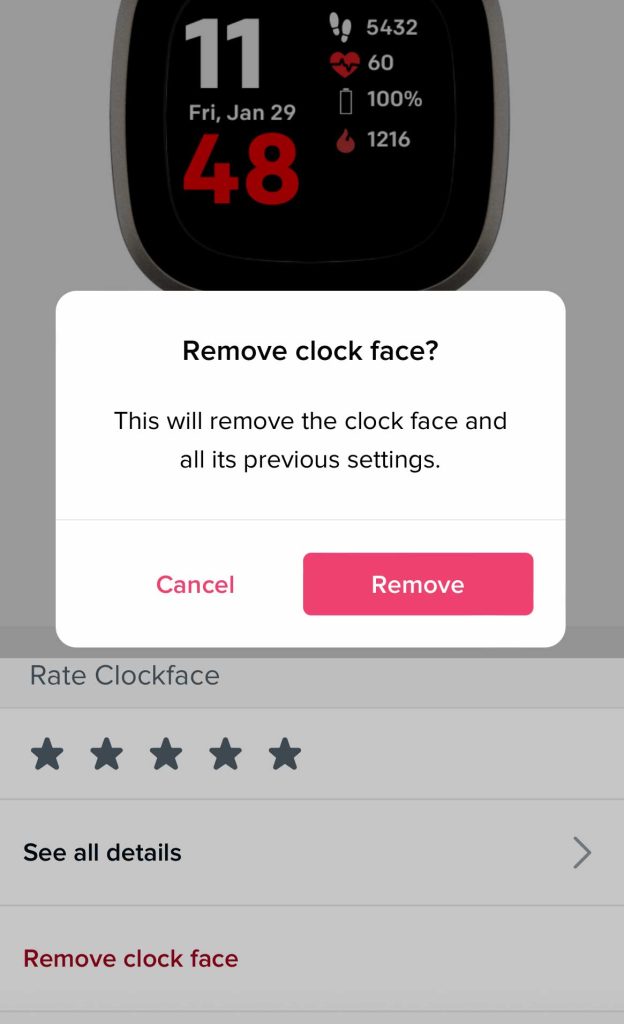
At this time, you cannot remove clock faces using your Fitbit’s Clocks app–you must use the Fitbit app.
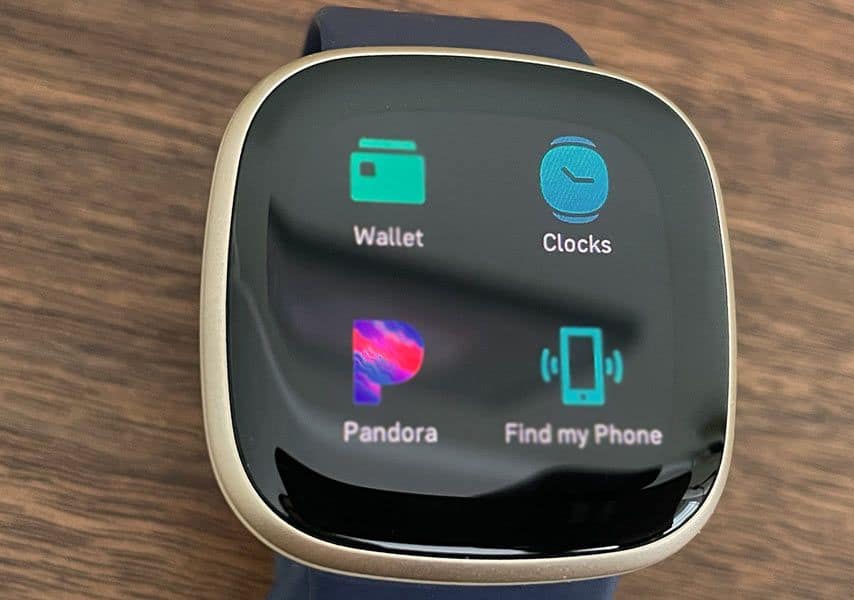
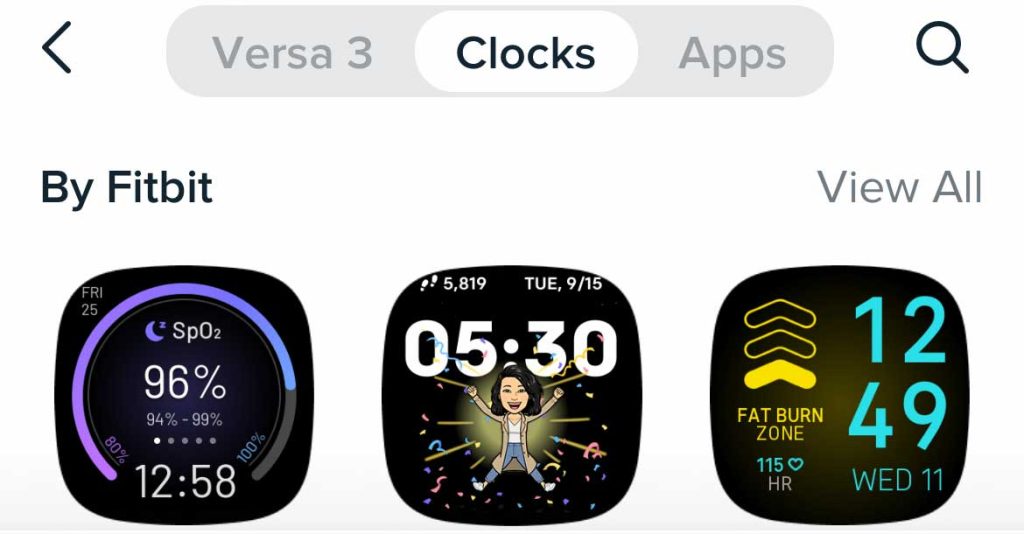
Not seeing a clockface at all? Change to a Fitbit one
If you see this clock face error on your Fitbit’s screen after updating it, open the Fitbit app and choose a clock face made by Fitbit, not a third-party.
- In the Fitbit app, select the Devices icon, choose your Fitbit, and open Gallery.
- Tap the Clocks tab at the top.
- Scroll down and select a face from By Fitbit.

Plug both your Fitbit and your phone into their chargers
Some people solved the issue of not installing a new clock face by simply plugging their Fitbits and phones (or tablets) into the chargers. We recommend charging it to at least 50% before proceeding. 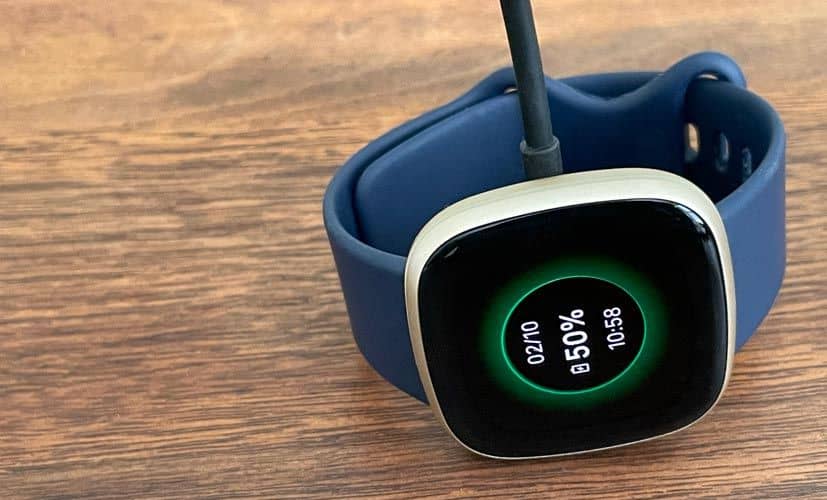
Place your Fitbit in its charger, connect your phone to its charger, wait a few minutes, and restart both devices.
After restarting, open the Fitbit app or use the Clocks app on your Fitbit smartwatch and try again to change its clock face.
Force close the Fitbit app
Forcing the Fitbit app to close (force stopping it) and then relaunching it often gets clock faces to show up.
Force Closing or Stopping an app ends all of the Fitbit app’s foreground and background processes immediately.
How to force close the Fitbit app on Apple and Android 11+
- Go to your Home Screen.
- Swipe up from the bottom and pause in the middle of your screen to open the app switcher.
- For older Apple devices, double-press the Home Button.
- Locate the Fitbit app by swiping right or left.
- Swipe up on the Fitbit app’s preview to force close the app.
- Restart your phone.
- Open the Fitbit app and check if you can change your device’s clock face.
You can also force stop the Fitbit app on Android by visiting the Settings app and locating the Fitbit app in your Applications. Then, select Force Stop or Force Quit. 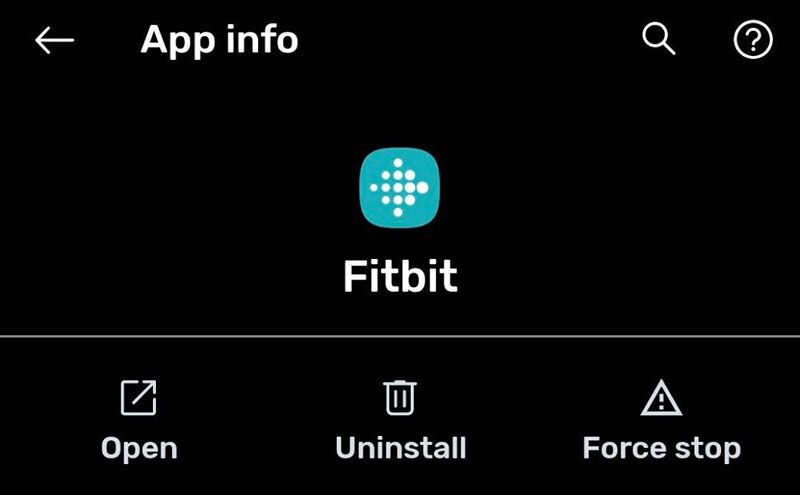
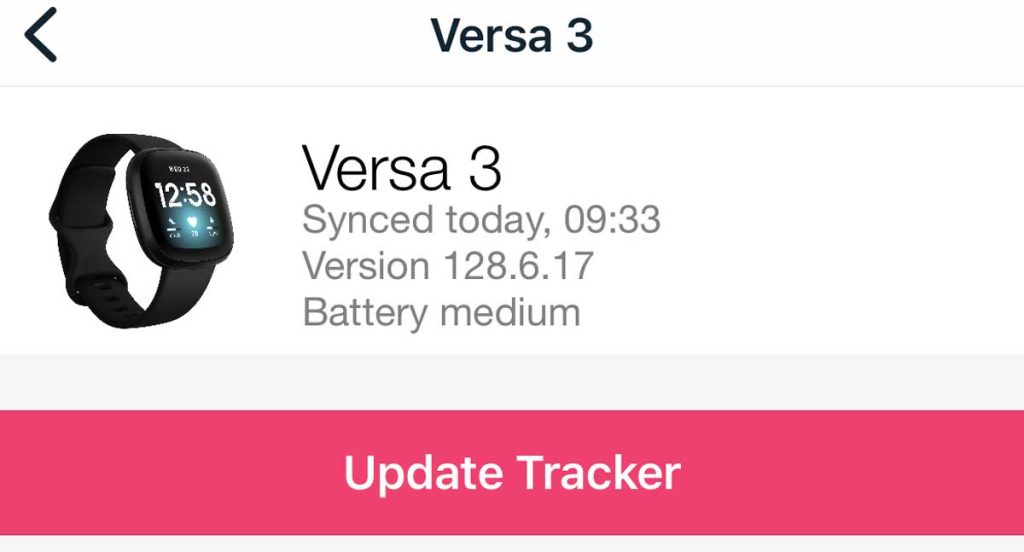
Update your Fitbit’s firmware
If you tried changing your Fitbit’s clock face but discovered that the Select button of your preferred clock face is greyed out, you likely need to update your Fitbit’s firmware.
Unfortunately, your device’s firmware download may not be immediately available. That’s because your Fitbit downloads update in the background when you sync your device with the Fitbit app.
For example, Fitbit’s Charge 4 requires an update to enable Clock faces, which can take up to 48 hours to complete.
How to update your Fitbit’s firmware in the Fitbit App
- Put your Fitbit on its charger and place it close to your phone, tablet, or computer.
- Open the Fitbit app. Choose the Devices icon.
- Select your Fitbit from the list of devices under Connected to Fitbit.

- Tap the pink update banner.
- This option only appears if an update is available and ready to download to your Fitbit.

- This option only appears if an update is available and ready to download to your Fitbit.
- Follow the on-screen instructions to update.
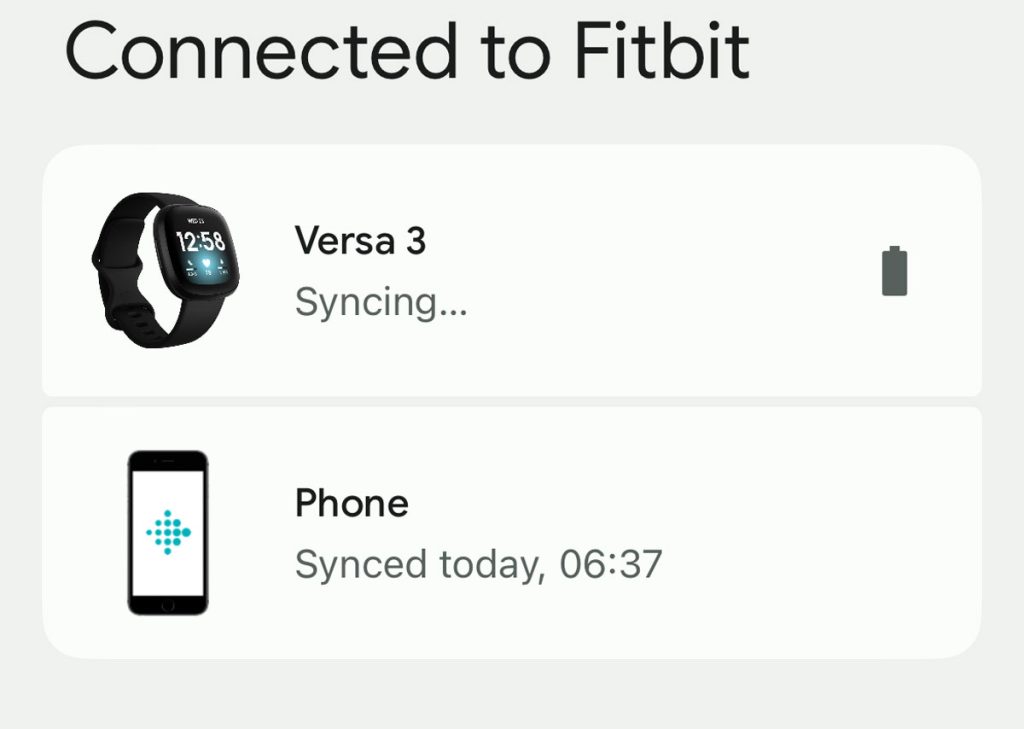
Remove and re-add your Fitbit
Sometimes, removing your Fitbit from your list of devices and then adding it back helps fix features that give errors or don’t show up.
- Open the Fitbit app and choose the Devices icon.

- Choose your Fitbit from the list.
- Wait for your Fitbit to sync.
- For Android, tap the trash can, and for Apple, scroll to the bottom and tap remove this device.
- Removing a Fitbit from your phone unpairs your Fitbit, and any data that was not synced is lost.

- Removing a Fitbit from your phone unpairs your Fitbit, and any data that was not synced is lost.
- Once removed, add your Fitbit device back to the app.
- Choose the option that says Set Up a Device.
- Select your model, place it on the charger if it’s not already on it, and follow the on-screen steps
- When the Fitbit app finds your device, look at your Fitbit’s screen for a pairing code and enter that into the app.
- Follow the remaining on-screen instructions to choose your preferences and add your Fitbit back into the app.


See this article for an in-depth tutorial: Got a new or replacement Fitbit? How to set it up so you don’t lose data.
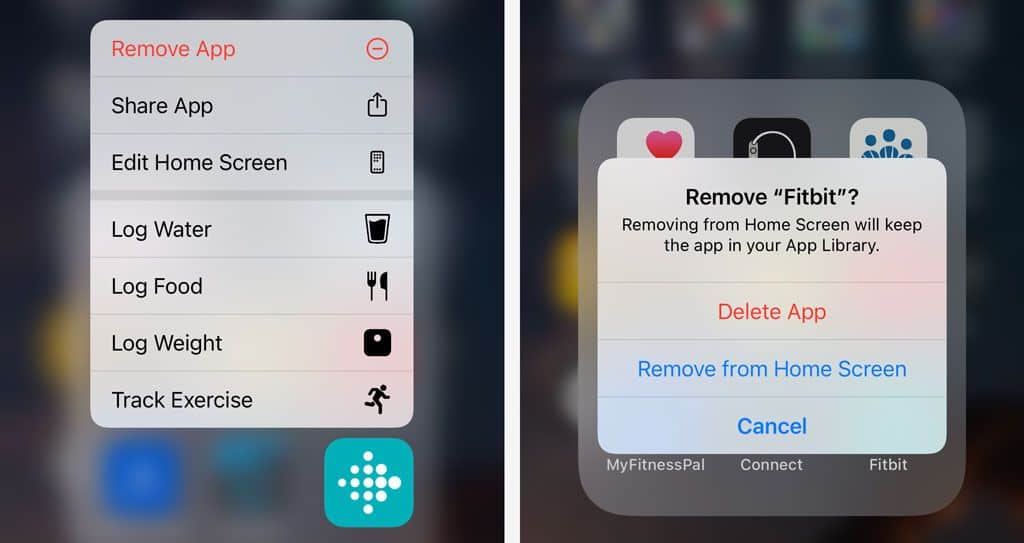
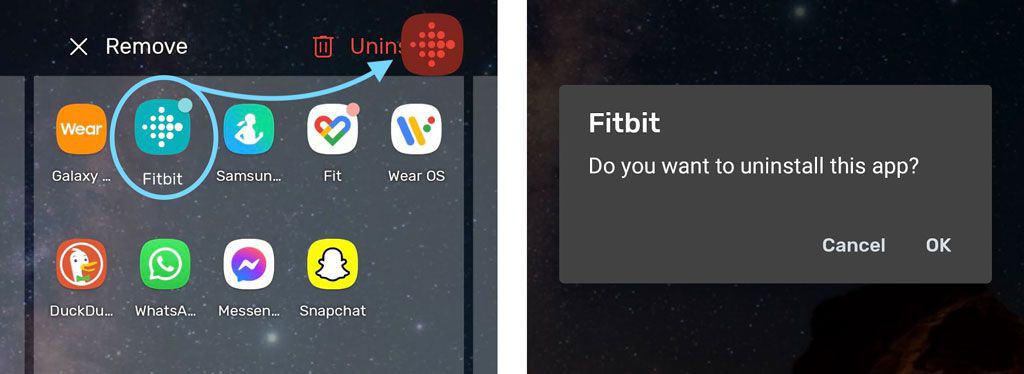
Uninstall and reinstall the Fitbit app
Uninstalling and reinstalling the Fitbit app often fixes issues like being unable to change the clock face.
When you uninstall the Fitbit app, you need to download it from the Apple App Store, Google Play Store, or Microsoft Store and sign back into your Fitbit account.
- For Apple devices, press and hold the Fitbit app icon until the Quick Actions Menu appears, choose Remove from the menu, then tap Delete App.

- You can also delete apps in Settings > General > iPhone Storage > Fitbit app > Delete App.
- For Android devices, touch and hold the Fitbit app icon and move it slightly until you see Remove or Uninstall options at the top of your screen. Drag the Fitbit app to Uninstall and confirm you want to delete it.

- You can also uninstall apps from Settings > Apps or Application manager > Fitbit app > Uninstall.
Check your Fitbit’s storage space and remove anything unused or not needed
Lack of device storage is a common issue, especially on Fitbits, where you install too many apps.
Try freeing up some space on your Fitbit by deleting apps, restarting your Fitbit, and then changing its clock face.
Check the clock face’s permissions
Many clock faces also require access to your user statistics and other private and personal information.
If you turn off these permissions, it causes the clock face to stop functioning.
To adjust what a clock face for your Fitbit has access to
- Open the Fitbit app and go to your device’s Gallery.
- Under My Clocks choose a clock face and tap on it.
- Choose to See all details and tap Permissions.

- Update your permissions by turning features on or off.

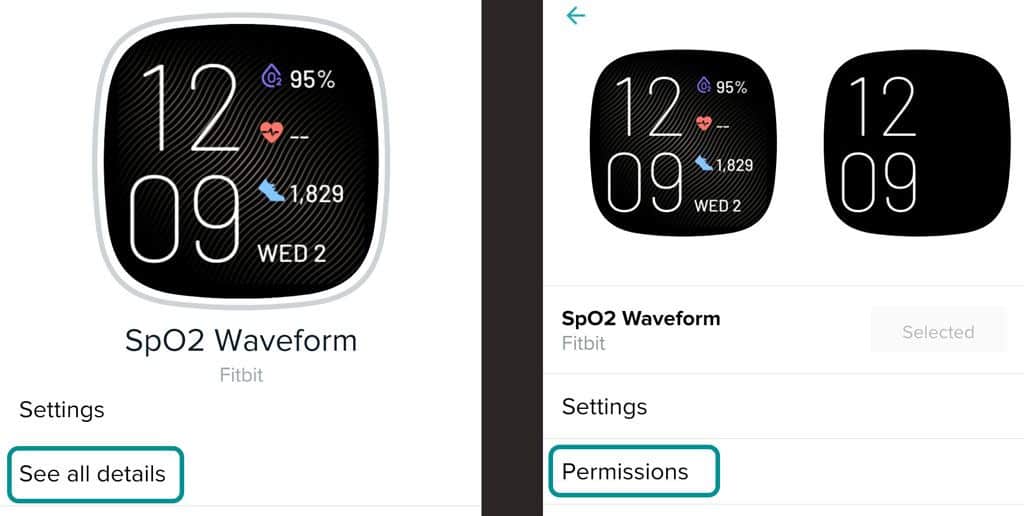
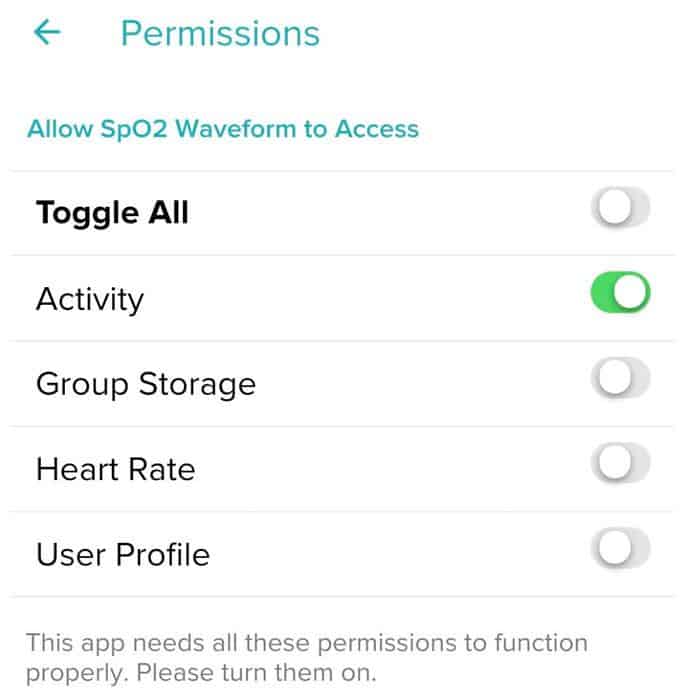
Every clock face is different, so that you won’t see the same types of permissions.
Unpair and forget your Fitbit from your phone’s Bluetooth settings
Some people found that removing their Fitbit from their phone’s Bluetooth settings solved the issue of a clock face not installing.
It may take several attempts until this works, so try it a couple of times.
- Go to your phone’s Bluetooth settings.
- Find your Fitbit from the list of BT devices and tap it.
- Select Forget or Forget this Device.

- Restart your phone. Do not pair at this point.
- Restart your Fitbit.
- Open the Fitbit app and pair your Fitbit with Bluetooth on your phone.
- Try to install the clock face again.

Factory reset 
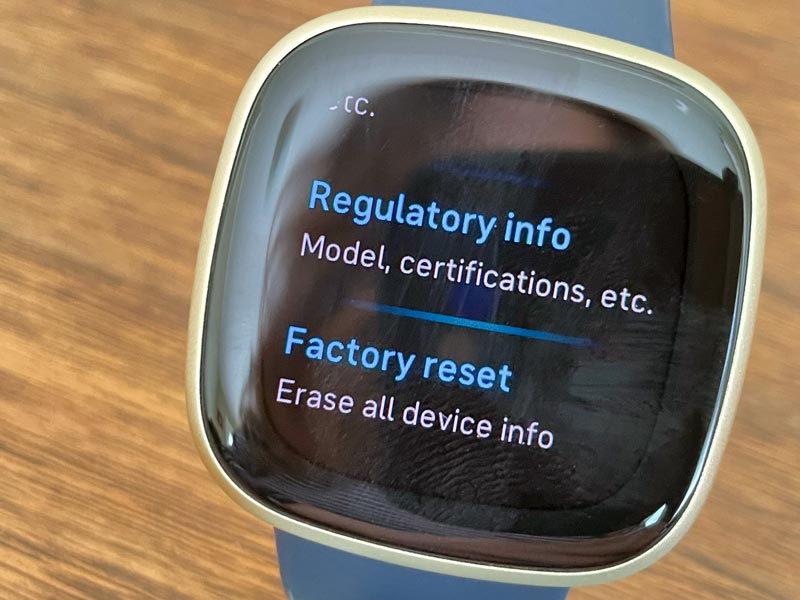
Try a factory reset if the other options don’t fix your Fitbit issue.
This action wipes all of your stored data and returns your Fitbit to its factory settings. So if you can sync your Fitbit before reset, do that via the Fitbit app and the Sync Now function.
Most models have different factory reset methods, so check out this article for step-by-step instructions: Do you need to restart or reset your Fitbit device? Learn the steps
If you have an older Fitbit model like the Fitbit Flex, Surge, and Blaze, these Fitbits that came out before 2016, cannot be factory reset.
FAQ 

How do I change My Fitbit clock face?
- With your device nearby, in the Fitbit app,
- Tap the Devices icon > choose your Fitbit’s name and image > select the Gallery.
- Choose the tile for Clock Faces and select All Clocks.
- Browse the available clock faces.
- While many are free, some third-party clock face developers require an additional payment–review the clock description for the cost before selecting it.
- Tap the clock face you want.
- Tap Select to install it.
- Sync your device to see the change.
What are saved clock faces?
On the Sense, Ionic, and Versa series, you can store up to 5 clock faces to switch between them.
Your Fitbit automatically saves your clock faces until you reach that limit.
Remove a stored clock face before installing another to save a new clock face when you already have five saved clock faces.
If you install a new clock face without removing a saved clock face, the new clock face shows up on your watch but isn’t added to your saved clock faces.
How do I adjust the settings of a clock face?
Many Fitbit users don’t realize that many clock faces feature different color themes or other settings.
To adjust the clock face settings, tap the installed clock face in the Fitbit app, choose Settings, then tap Customize.
How do I contact Fitbit customer support?
You can contact customer support in several ways. For quick access, try Fitbit’s customer service chat!
Summary
I hope that this article has helped you change your Fitbit clock face successfully and that your new clock face will inspire and motivate you!
If you have any more questions or anything to add, please feel free to let us and everyone else know about it in the comments section below!
If you liked this article, you can follow us on social media by using the social media buttons!


